Sunday, May 31, 2009

Triple Christmas Card Catchup

Here we are at the last day of the month with me hussling to get that monthly Christmas Card Challenge done! I had to do 3 today to complete the challenge. While I was grumbling to myself I thought "hey, better to only have to rush to do 3 today than to rush to do 60 in December, right?!?!" Then I felt better.

My first card was inspired by this card from Today's Featured Stamper, Rox71. I changed the sketch, the images just a bit (but kept the same feel), and I accidentally went WAY darker on the color scheme. The sketch was from this week's OCC challenge.


Stamps: A Muse Santa’s Silhouette, Lovely as a Tree
Paper: Whisper White, Soft Sky
Ink: Soft Sky, Blue Bayou, Not Quite Navy, Night of Navy, Black
Accessories: White gel pen, Sky Blue Ribbon from Pink Hedgehog

My next card was a "quickie" inspired by this card from Rox71. I left off the half circle embellishments, used different but similar stamps, and reduced the number of layers (sorry, I'm not so good and photographing shiny things!).

Stamps: Snowfall, Sincere Salutations, Autumn Leaves Swirls VI
Paper: Real Red, Silver metallic from Mike’s
Ink: Versamark
Accessories: Silver detail embossing powder and Winter Wonderland embossing powder both from Mike’s, heat gun

And for my 3rd and final card....I started this one a while ago and just finished today. The sketch is based on Taylored Expressions Cupcake Challenge # 65. Normally, I center this floor image but for this sketch, I moved it as far to the left as I could. This made the floor draw your eyes right up to the kitty. If I had centered the floor, your eyes would have been confused as to where to go.


Stamps: High Hopes Callie Christmas Kitty, Digi Floor you can find here
Paper: Creamy Caramel, Riding Hood Red, Basic Grey Wassail DP
Ink:
Accessories: Copics, Prismacolor pencils and Goo Gone, glitter pen

Enjoy!

Michelle B.

"Queen of the Scene"

Saturday, May 30, 2009

Hats off Graduates!

Last night was my DD's dance recital. We were out late so I just couldn't get up for the sketch challenge today. Maybe later...

Recently I made some graduation cards (but didn't have time to post them before now!). I started with the sketch from Taylor's Cupcake Sketch #69. The first card, for a boy, is only two layers....the grey rectangle and scallops are the card base showing thru. The second card, for a girl, is more "fussy" with multiple layers and more color (yellow).

To make these scenes, I stamped the graduation hats, colored, and embossed them using clear detail embossing powder. I used a new sky technique I've been wanting to try. You can find the instructions here. I like its natural look but I had to think about the shapes a bit so I was slow. I'm sure I'll get faster as I gain more experience with this technique.


Stamps: Pink Cat Studio Lily & Billy Accessories
Paper: GP 110, Basic Grey, Summer Sun
Ink: Going Grey, Distress Ink Broken China
Accessories: Copics, Prismacolor pencils and Goo Gone, Nesties


Enjoy!

Michelle B.

"Queen of the Scene"

Serving up the BIG 3-0


I needed to make a card for my BIL’s 30th and today’s inspiration challenge was a perfect opportunity. I was inspired by the colors (grays with a little pop of red) and chef in this book. This card turned out exactly like I envisioned (shocker!) and I think this may just be my “go to” black birthday card!

To make this card, I cut out the gray cardstock and stamped the chef with his tray in the center. I used a template I had left over from this card (the shape of the template is pictured there as well). I put the center of the template in the center of the tray and sponged away. Then I colored and paperpieced the rest of the chef into place. The 30 was cut from my Cricut machine using the Storybook cartridge.

Stamps: Voila
Paper: GP 110, SU DP, Going Grey, Basic Grey, Black, silver dp from Mike’s
Ink: Going Grey
Accessories: Copics, Prismacolor pencils and Goo Gone, Cricut Storybook

PS: Sorry I've been away a lot this week. My kids have started their summer vacations and it was my last week as a part time worker. We spent all week visiting some of our favorite St. Louis spots! We had a blast!

Enjoy!
Michelle B.
“Queen of the Scene”

Tuesday, May 26, 2009

Tips n Tricks Tuesday # 14 - The Silhouette Treatment

Whenever I use a silhouetted image, I like to do what I call "the silhouette treatment". I learned this from the fabulous Michelle Zindorf. This is a very simple technique that adds a lot of "pop" to silhouettes.


First, I try not to use black for the silhouette images when I can. I often use Night of Navy. After I stamp the silhouette images, I use a fine black marker to draw a small line anywhere on the left edge of the image where I shadow might be (skip this step if you stamped the silhouette image in black). Next, I use a white gel pen to draw a small dot or line anywhere on the RIGHT edge of the image where a highlight might be. That's it! Let's see what the end effect is.


BEFORE:


AFTER:


Enjoy!
Michelle B.

“Queen of the Scene”


Monday, May 25, 2009

FS120 Sunset Silhouette


This is for Featured Stamper FS120 (although I'm a bit late!). I was inspired by this creation. I changed the sketch (and used the sketch from challenge TECC69), I changed the stamp set but stayed with a similar floral silhouette, and I also added some darker, more vivid colors to the original soft color scheme.
This background is all airbrushed. I am finding that airbrushing backgrounds isn't much different than sponging them in the way I mask. I masked of the green grass area at the bottom and sprayed it. I then sprayed in the pink circular shape for the sunset. Finally I sprayed the blue sky around. I stamped my images in Night of Navy. I thought it needed to be a little darker across the bottom so I sponged some Night of Navy there. I used my nesties to cut out the rectangle in the center and also for the scalloped corner. I matted all the images and adhered together to finish.
Stamps: Essense of Love
Paper: GP 110, Night of Navy, Tempting Turquoise
Ink: Night of Navy
Accessories: Copics & Copic airbrush system, Nesties, white gel pen, fine black marker
Enjoy!
Michelle B.
“Queen of the Scene”

Wednesday, May 20, 2009

Santa on the Beach


Now here’s the kind of Christmas card I can get into! I barely got this done before work as I started off making something totally different!

I used today’s sketch challenge as my start. This also qualifies for this weeks High Hopes challenge to doodle as the white waves crashing onto the beach are doodled in.

The beach and ocean are masked and airbrushed....FAST! The clouds are sponged using Mother Mark's cloud tutorial....my favorite way to get a great sky FAST!

Gotta run before I'm late for work!

Stamps: High Hopes Tropical Santa, High Hopes Shell Two, High Hopes Palm Tree, Itty Bitty Backgrounds
Paper: GP 110, Real Red
Ink: Baja Breeze, Chocolate Chip, Close to Cocoa
Accessories: Copics & Copic airbrush system, Nesties, white gel pen

Enjoy!
Michelle B.
"Queen of the Scene”

Tuesday, May 19, 2009

Tips n Tricks Tuesday # 13 - Ink & Ink Pad Storage


For today's topic: how I store my ink and ink pads. Would you be shocked if I told you that this is all the full size ink pads I own? Yep, its true! I have all the stamp spots though (which is why I have so many reinkers as I use the spots up pretty quickly doing backgrounds).

Now remember that I'm CHEAP so I want to spend all my stamp budget on stamps and not other things. So I found some instructions to make this myself out of foam core board that I happened to have laying around. Obviously you can see the ink pad storage columns and I also keep my extra clean sponges and my bottle of stamp cleaner spray here. On the top I store all my reinkers, Liquid Pears, Stickles, Shimmerz and a brush for Shimmerz.

You can find the complete instructions to make your own ink pad holder here.

Enjoy!
Michelle B.
“Queen of the Scene”

Friday, May 15, 2009

Running as fast as I can.....

but I didn't have time to get a card done today. I spent the day preparing to take our Girl Scout troop camping this weekend. I'm on my way out the door now and won't be back til Sunday. Have a good weekend!

Michelle

Wednesday, May 13, 2009

Caribbean Penguin


I created this bright and early this morning for Sketch Challenge 228 and the ongoing Christmas Card Challenge. Wow I was sleepy this morning. I thought I had a Baja Breeze cardbase but later realized it was Cool Caribbean. Hey, I think it worked just fine after all! The only thing I'd change here is to move that large snowflake a little to the right so there was more of the base showing on the left edge (like the sentiment).

Testing out my new Nesties, I used a pencil to trace over where they should be cut out on the back. Next I embossed the snow dots on the front by stamping with Virsamark and then covering with clear detail embossing powder (you must you the "detail" kind!). I masked off the ground area with a torn piece of paper.I sponged Soft Sky all over the sky area, then Baja Breeze (not all the way to the center), and then Pacific Point in just the upper corners and edges. Then I cut out the rectangles with my Nesties, inserted some Pacific Point, and adhered everything down.

Here is how I color.

Here is how I make snow drifts.

Here is how I cut out my scenes.

Stamps: Whipper Snapper Warm Penguin,Itty Bitty Backgrounds,The Cat’s Pajamas Candyland Christmas (sentiment)
Paper: Cool Caribbean, Pacific Point, Whisper White, GP 110
Ink: Soft Sky, Baja Breeze, Pacific Point
Accessories: Copics, Prismacolor pencils and Goo Gone, Cuttlebug Snowflake, Nesties, Clear Detail Embossing Powder, Virsamark Pad, Heat Gun, Angel Wingz Shimmerz (on snowflake and ground)

Enjoy!
Michelle B.
“Queen of the Scene”

Tuesday, May 12, 2009

Tips n Tricks Tuesday # 12 - Masks


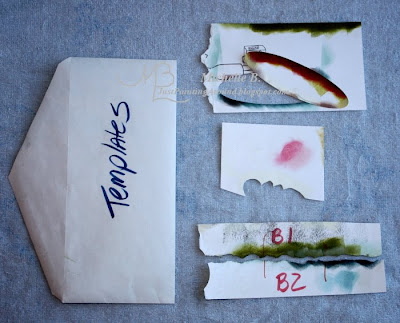
I often use Georgia Pacific 110 cardstock for my masks. This is durable enough that I can use them many dozens of times (am I cheap or what!?!?). I store these in a little envelope on my stamp table marked "templates". I don't know why it says that! It should say Masks!! Oh, well!

The top mask set is used for making tables.

The middle mask is for clouds.

The mask set at the bottom of the pic is what I use for ground and sky. You'll notice that I've labeled the top B1 and the bottom B2 (because I have more than one set of these and I get mixed up!). Also notice the vertical red line on both pieces. As this is a torn piece of paper, I often cannot figure out how it goes back together when I'm trying to line up the masks on my piece (hey, I do most of my cardmaking at 2 AM!) so I drew this line across both pieces so I could line it up perfectly every time.

Some masks are labeled as to what they are for (prolly should do this on all of them!). Also, you'll probably want to watch when sponging with a mask that you don't mix up the colors. A few weeks ago, I used a mask with green ink on it to sponge some blue snow drifts. My sponge picked up some of the green off the mask and it ended up on my project. I had some wonky looking snow!

Enjoy!
Michelle B.
“Queen of the Scene”

Sunday, May 10, 2009

Copic Airbrush is Cool!


Happy Mother's Day! My fab husband gave me an air compressor so I can use my Copics to airbrush. This is my first airbrushed card. I used this week's OCCC sketch challenge and this card from today's Featured Stamper to get me started.


I have lots to learn but it's WAY fun! I'll share more when I feel like I've "got it". Here's a pic of me and my new toy bright and early this morning (no makeup, hadn't combed hair, still in jammies - the "real" me! Ha!)


Stamps: H and M Stamps Fun in the Sun
Paper: Real Red, GP 110
Ink: Chocolate Chip
Accessories: Copic airbrush system, Nesties


Enjoy your day!
Michelle B.
"Queen of the Scene"

Saturday, May 9, 2009

IC179 Billy Wins


When I saw this image from today's inspiration challenge, it made me think of the comic book super heros and how they always have that star thing in the background. When I need a superhero, I call Billy.

I used Mother Mark's cloud technique (oh so fast!) with Baja Breeze. I hand drew the sidewalk and colored in the grass with Copics. I hand drew and cutout the yellow star thing and sponged some Summer Sun ink in the center of it. Billy is colored my usual way and attached. I used Basic Grey because I like it and just don't use it enough. I also double matted my main image - I'm not sure I've ever done that before but it was just right for this one.

3 birthday parties to go to this afternoon so I gotta run!

Stamps: Pink Cat Studio Billy Plate 1
Paper: Basic Grey, Real Red, Whisper White, Yo Yo Yellow
Ink: Baja Breeze, Summer Sun
Accessories: Copics, Prismacolor pencils and Goo Gone


Enjoy!
Michelle B.
"Queen of the Scene"

Thursday, May 7, 2009

Mother’s Day Flowers ‘09

I’m catching up on some challenges: Featured Stamper 117, Sketch from TECC66, and OCCC to make a Mother’s Day card. For the Featured Stamper card, I loved the texture and the stamped leaves behind the cutout flowers on THIS card. So I recreated those. I used different punches, different colors, and changed out the sketch.

Do you follow Markie’s Mom (Faith)’s blog? I totally love what she does with punches. I tried to give it a shot here but I certainly don’t have the knack she does! I did add sponging to pretty much every element on this card.

Here is how I made the table.

Stamps: Love Blooms
Paper: Chocolate Chip, Baja Breeze, Regal Rose, Bazzill yellow, Close to Cocoa, GP 110, Basic Grey Urban Prairie DP
Ink: Certainly Celery, Baja Breeze, Chocolate Chip, Rose Red, Summer Sun, Regal Rose
Accessories: White Prismacolor pencil, Basic Grey Urban Prairie DP, Nesties Classic Long Rectangle, Martha Stewart Classic Butterfly (3 in 1) punch, Marvy Vase Punch, Boho Blossoms Punch, ¼” circle punch, Spots and Dots Embossing Folder

Enjoy!
Michelle B.
“Queen of the Scene”

Wednesday, May 6, 2009

SC227 Sassy on the Farm


I’ve been really busy lately but I refuse to allow anything to get in the way of my Wednesday morning sketch challenge!

First, I cut the vertical rectangle out first with my new Nesties (Cut then Ink Technique). I masked off the ground line and inked up some Mother Mark's clouds. Then I masked off the sky and sponged the grass with Kiwi Kiss at the back and Old Olive in the front (making the grass lighter at the back creates the feeling of distance). After inking the background, I cut the two horizontal strips out. NOTE: I didn't make one cut and separate, I actually cut a 1/8" strip out so everything lines up. I used my Cricut George cartridge to cut the small oval and its mat. My images were colored my usual way, cut out, and adhered into place. Off to work!

Stamps: Sugar Nellie Sweet ‘n Sassy, Treehouse Stamps Happy Fall Y’All, Hanna Stamps Things Hanna Would Say
Paper: Real Red, Whisper White, GP 110
Ink: Baja Breeze, Kiwi Kiss, Old Olive
Accessories: Copics, Prismacolor pencils and Goo Gone, Nesties, Cricut George Cartridge, Scallop Edge Punch

Enjoy!
Michelle B.
"Queen of the Scene”

Tuesday, May 5, 2009

Tips n Tricks Tuesday # 11 - A Little Cricut Help


Sorry I've been gone so long...in the last week I worked 3 days, held a Girl Scout meeting, helped run a game at our school's field day, hosted a school dance for 150 Girls Scouts that I've been planning for 1 year, spent an entire day at a dance competition, and attended 2 soccer games, shew! And next weekend doesn't look any better! Ha! Please bare with me as I slowly transition my life back to working full time!

Today, I'm going to show you something I've done to help me use my Cricut more efficiently. My only means of cutting circles and ovals was my Cricut (just got some Nesties, woo hoo!). I found I was having trouble guessing what size circle or oval I needed for my particular project. To solve this problem I just cut several sizes out on inexpensive Georgia Pacific 110 Cardstock, carefully labeled the size it was cut at, and store them in a sheet protector near my Cricut (me and the sheet protectors!). I use the swiss cheese looking sheet to hold over an image to determine the correct size for that image. I use the individual circles to when working on my sketch to see if that size will fit in the sketch or not. This has saved me tons of time and wasted paper from bad cuts. I'm also planning to do this for several of the interesting frame shapes from my newer Storybook cartridge and also some other shapes like leafy fronds, snowflakes, etc.

Enjoy!
Michelle B.
“Queen of the Scene”