Tuesday, June 30, 2009

Look, Its Me!


I've always loved this image because it reminds me of myself when I was big into painting. I do own a little bit of designer paper and I've been trying to incorporate it into my scenes lately. I kid myself that it will be a faster way to cover a large area but I forget to add the "struggle time" I waste trying to make it work. For me, it would be easier to do the full blown scene! The sketch is from Taylored Expressions Cupcake Challenge TECC73. I actually made this card last week for the challenge but never had time to post it.....heavy sigh......


Colored this image my usual way. I made a mask using Eclipse tape and then sponged the Old Olive grass across the bottom. Next I sponged the clouds using Mother Mark's cloud tutorial (I am really loving this technique for some quick clouds!). I cut out the teddy bear painting using my Nesties (loving them!....again, saves me time in cutting) and then cut out the main image with my paper cutter. When I was laying the main images on the dp, they seemed to bright so I aged them a bit with some Creamy Caramel sponging around the edges. I stamped some sentiments in the blank area of pink at the top, assembled they card, and I was done!


Stamps: Sarah Kay Paint Me a Picture, Various sentiments from H&M Stamps
Paper: GP 110, Pixie Pink, Basic Gray DP
Ink: Momento Tuxedo Black, Old Olive, Soft Sky, Creamy Caramel
Accessories: Copics, Prismacolor pencils and Goo Gone, Nesties


PS: And how's this full time work thing going for me? I did really well up until today when I sat at my desk all morning fighting the tears. I don't know what triggered it but I was really missing my kids this morning. I've got some days off coming up soon so I'm looking forward to that.

Enjoy!
Michelle B.
“Queen of the Scene”

Saturday, June 27, 2009

IC186 Beachy Inspired

My kids are both having sleepovers so I needed something to keep me awake while I waited for them to fall asleep. Luckily, the inspiration challenge was posted. When I looked thru the inspiration gallery, I saw a couple of common themes: girls, polkadots words over everything (eek, even the pretty girls face!). I choose this pic as my inspiration.
I airbrushed the background (you could sponge or brayer) using paper as masks. Then I stamped the sentiment in black. Next came some "waves" with the white gel pen. I stamped a few dots (prolly too many but that's ok). I drew in a few sand dunes for Bella to stand on. I colored Bella my usual way, cut her out, and glued her onto the piece. She needed a little sparkle, so I added some sparkle with a glitter pen. Yep, I chickened out and couldn't put any words over Bella's face!
Stamps: Stamping Bella Betty Bombshell, Stamping Bella Sentiment, Treehouse Stamps Butterfly Kisses (for those little dots)
Paper: GP 110, Tangerine Tango
Ink: Momento Tuxedo Black, Tangerine Tango, Riding Hood Red, Green Galore, Pixie Pink
Accessories: Copics, Prismacolor pencils and Goo Gone, Copic Air Brush System, Fine black marker, White gel pen, Glitter pen
Enjoy!
Michelle B.
"Queen of the Scene"

Tuesday, June 23, 2009

Tips n Tricks Tuesday #16 - Photo Help # 2

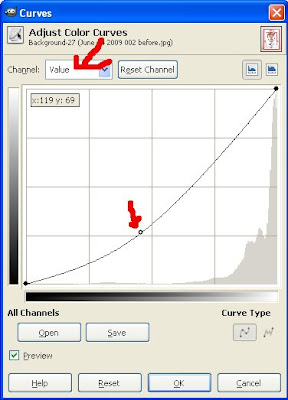
I've already explained how I edit my photos most of the time (you can find that post here). Every once in a while that just isn't quite enough. So the other tool I use in GIMP is under the menu choices Color--->Curves.


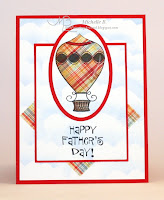
Now the use of this tool is an ART, not a science, so I cannot tell you exactly what to do. Just get in there and play! Normally, I just grab that little handle near the lower arrow and move that around until I get what I like. Once in a great while, I might actually only adjust one color by changing the choice near the top arrow. For example, if the red is just too strong, I might go in here, choose red, and tone it down a bit. Here's a card before (you sick of this card yet?):


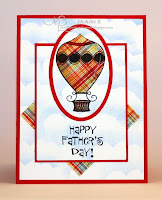
And after:

Those clouds are just a little more vivid.

Enjoy!
Michelle B.
"Queen of the Scene"

Saturday, June 20, 2009

Happy Father's Day 2009


This was the result of deciding not to decide....I just couldn't decide what kind of scene to make DH for father's day. Then I saw the Bella sketch challenge and had a light bulb moment...Why not do a series of mini scenes! Each of these scenes represents something my husband does with our children. I think it turned out really fun!
I think it would take me 3 hours to write up all the steps I did here so please forgive me for cheating this time!
Stamps: H and M Dad’s Outdoors, H and M ATV, Hanna Stamps Pool Party, Pink Cat Studio Dress Up Billy, Pink Cat Studio Lily & Billy Accessories
Paper: Baja Breeze, Chocolate Chip, GP 110
Ink: Baja Breeze, Chocolate Chip, Basic Black, Momento Tuxedo Black
Accessories: Copics, Prismacolor pencils and Goo Gone, Nesties, Word Window Punch, 1 ½” square punch, Embossing Folder Spots and Dots, Copic Air Brush System
Enjoy!
Michelle B.
"Queen of the Scene"

Wednesday, June 17, 2009

SC233 Gardening


Bright and early this morning I'm up to do the SCS sketch challenge. I think it took me a half hour at the stamp table before I was really awake! Now I'm rushing to get this posted and get to work.

I used my Cut then Ink Technique (with Nesties) to cut the sketch. Then I tore a mask for the dirt area. I used an old mask for the top line where the ground meets the sky. I sponged in some Creamy Caramel for dirt. I then moved the mask around a little and sponged Close to Cocoa and even a little Chocolate Chip to get the rough texture of the dirt. Next I sponged in the Old Olive grassy area. It was a little boring so I added the tufts of grass. Finally I sponged the sky in Soft Sky with a little Baja Breeze in the top corners. Again, I felt this was a little boring, so I added some of my clouds. You can pick up my cloud shape here. Inserted all the frames behind the elements of the sketch, glued everything down, and I'm done and off to work!

Stamps: Sugar Nellie Planting Some Love, CC Designs Sugarplum Scenery Set
Paper: Whisper White, Real Red
Ink: Creamy Caramel, Close to Cocoa, Chocolate Chip, Old Olive, Soft Sky, Baja Breeze, Whisper White, Momento Tuxedo Black
Accessories: Copics, Nesties, White prismacolor pencil, blender pen (to color in the areas I didn’t cut out!)


Enjoy!
Michelle B.
“Queen of the Scene”

Sunday, June 14, 2009

Tips n Tricks - Clouds

I just figured out what I didn't like about my clouds and I thought I'd share in case you were doing the same thing. I was using the Mother Mark style of clouds (instructions found here) but mine just weren't as lovely. Then I realized that I was "squishing" them too close together. This card shows them both "squished" and with more space. Hope that helps you too.


Enjoy!
Michelle B.
"Queen of the Scene"

Father's Day Balloon


Needed to make a Father's Day card today so I looked for some inspiration in Today's Featured Stamper's Gallery (FS123) and I found this card.

What got my attention is that there is nothing but sky around that butterfly. I love to add tons of details to my scenes but my time is at a premium lately. I thought this might be a way to use my new hot air balloon stamps without spending tons of time on the background. I kept the same simple sky as the featured stamper but I changed the main stamp, the sketch (used Mojo90), and the color scheme.

I am also still struggling to learn to use DP so here was another little DP experiment. I think I would have liked it better if the plaid had more blue in it but its ok.

Stamps: Verve Up, Up, & Away, Sentiment from The Angel Company
Paper: Whisper White, Real Red, DP from Treehouse Stamps
Ink: Bashful Blue, Creamy Caramel (shading on the balloon dp), Momento Tuxedo Black
Accessories: Copics, Nesties


Enjoy!
Michelle B.
"Queen of the Scene"

Wednesday, June 10, 2009

SC232 Anniversary

Today's sketch challenge was perfect for an anniversary card for DH – 13 years this weekend! I was a little sloppy with my sky here but I can’t stress over it….gotta get to work!

Even though I just bought some new tree stamps, I decided to do bushes here. Ha! I masked off the area with torn paper.I sprayed the medium green over the entire area (you can do the same thing with sponging). Then I sprayed a darker green just across the bottom. Finally, I went in and just pressed the brush tip (point up) into some leaf shapes in 2 different colors. If I hadn't been so sloppy, I think I would like the bushes.

The dirt road is sprayed in a light brown and then I used a torn paper mask and sprayed some darker hills. Again, anything I do with the airbrush, you can also do with sponges (so far as I've seen anyway).

Stamps: Pink Cat Studio Lily & Billy Sweetheart
Paper: GP 110, Brilliant Blue
Ink: Certainly Celery, Baja Breeze
Accessories: Copics & Airbrush System, Prismacolor pencils and Goo Gone, Nesties

Enjoy!
Michelle B.
“Queen of the Scene”

Monday, June 8, 2009

Awesome Snowflakes

I'm now on week 2 of this full time job. I'm doing better than I expected but I feel like I have to totally reorganize my life and my time. Therefore, I've decided stop posting Tuesday Tips and Tricks EVERY Tuesday. I'll do them as I have time. I need to make some cards! But I have something a little different for you today.

One of the St. Louis places I recently took my kids was the City Museum. This is the most unusual and awesome place I've ever seen. There is so much creativity here that it blows my mind how someone even thought of this. Almost everything in the place is made from repurposed items. I could go on and on about how cool this place is so be sure you visit if you are ever in St. Louis. Anyway....I meant to focus on the snowflakes here. While exploring the museum, we came across a woman, Marion Nichols, who was making snowflakes. But these aren't your ordinary snowflakes. Each one of them has an unexpected image in them if you look closely. Here are the ones we made (sorry, not my best photos):

Dog snowflake I made:


Penguin's by my 6 yo DS:


Monkey's by my 10 yo DD:


Now one of the tricks I learned here was that you can cut all those layers of folded paper like butter by using a pair of Revlon Toe Nail scissors. Would you like to give this a try? I found a sample pattern online here. You can print this off of your computer, fold, and cut (all instructions are there too!). I haven't tried it yet but I've heard that if you print the patterns at 50%, they'll fit on the front of a card.

Marion Nichols has several books out of patterns like the one above where you can just copy, fold, and cut. They run about $16 each plus a couple bucks shipping. Some of the themes are holiday snowflakes, animal snowflakes, dinsosaur snowflakes, insect snowflakes, musical instrument snowflakes (has an awesome guitar), ocean creatures snowflakes, astroligical symbols, and fairies and mystical creatures. Here's where you can order those books.

Enjoy!
Michelle B.
"Queen of the Scene"

Wednesday, June 3, 2009

Wrong Way Butterfly

Today's sketch challenge gave me my start to this card....but....when I was flipping this upside down, I accidentally cut the square out on the wrong side! Oops!

I was also inspired by some recent work of Faith (Markie's Mom) to do a silhouette in pinks/reds. I think I've done the background in these colors before but never the actual silhouettes. And don't forget to give those silhouettes The Silhouette Treatment. The background airbrushed. The butterflies were run thru the Swiss Dots embossing folder and then I added some sparkle but drawing in a few lines with my glitter pen and smearing them with my finger.

Stamps: Essence of Love
Paper: GP 110, Bazzill
Ink: Rose Red
Accessories: Copics & Airbrush System, Martha Stewart Butterfly Punch, Glitter Pen, Nesties, Swiss Dots Embossing Folder


Enjoy!
Michelle B.
"Queen of the Scene"

PS: This is day 3 of my "new life" working full time. I think I'm hanging in there ok. I haven't worked 3 days in a row for years!

Tuesday, June 2, 2009

Tips n Tricks Tuesday # 15 - Shading when Paper Piecing

Hey, just because you are paper piecing doesn't mean you shouldn't take a minute to add some shading. I shade and highlight just as I would if I had colored the area in.


Here's a picture of a card I made with paper piecing and NO SHADING/HIGHLIGHTING to the paper pieced areas:


Now, here's the same card after I ADDED SHADING/HIGHLIGHTING to the tray, and jacket (and the scarf needed something too):

I think it really adds a lot of dimension to the piece (and you know I like that)!

Enjoy!
Michelle B.
"Queen of the Scene"

Monday, June 1, 2009

Funny for my Sis

Side note: My little brother (an amazingly giftly artist and professional graphic designer) just left on his bicycle for a 1200 mile trip! If you'd like to hear about his adventures, you can check out his blog here.


As soon as I saw the sentiment in this set, I knew I'd have to get it for my sister. Even tho she lives several states away, I bet I'll be able to hear her laugh!!! I used Taylored Expressions Cupcake Challenge # 70.

I'm still experimenting with my Nesties and trying to increase my speed. So this time I figured out what size Nesties I'd need for my images and penciled in the sketch on the back of my cardstock. I airbrushed the background (you could get the same effect from sponging). Next I stamped just the leaves from the High Hopes Banana Tree in Old Olive. This gives the feel of a jungle without going thru all the work. I then cut out the shapes using my Nesties and paper cutter. The images were colored my usual way and cutout. The great thing here is that these were digi images so I was able to make that dinosour small enough for the circle. Finally, I assempled all the parts.

Stamps: CC Designs Eric and Chrissy Go Prehistoric (digi), High Hopes Banana Tree
Paper: GP 110, Tempting Turquoise, Only Orange
Ink: Old Olive, Momento Tuxedo Black
Accessories: Copics, Prismacolor pencils and Goo Gone, Candle Light Shimmerz (on her bone)


Enjoy!
Michelle B.
"Queen of the Scene"