Wednesday, October 29, 2008

It's a great day and BLOG CANDY!!!

Whoo hoo! I was contacted out of the clear blue sky by Ashley at Treehouse Stamps and offered a Guest Designer spot! I said yes of course! I've had difficulty maintaining my composure all day today (I really just want to break out in a happy dance...maybe after everyone goes to bed here!). I can't wait to get started.

AND

My blog passed the 5000 views mark today. When I started my blog a few months ago, I planned to offer blog candy at 500 views. By my best calculations that should have taken about a year. HA!


To say thanks to everyone, I am offering this clipboard that I hand painted. What's it for? I have one similar to this that I carry around in a bag with some stamped images and coloring tools so I can color while I sit at dance and wait for my DD, etc. Why isn't it stamped? You could do that yourself! I thought you might like this because it was different. I chose this particular design as its something I often taught in a first or second One Stroke painting lesson. I did stamp the word "Create" (from my See D's A Word or Two set) with paint as painting words is just not my best skill. To enter just leave a comment on this post by Monday, November 3rd at midnight CST and I'll use Random.org to select a winner Tuesday morning. And for my friends in Canada and Australia (or other places too), I will ship internationally!

ETA: I have opened this up so you could post anonymously (if you don't have any logins to the different systems). Sorry that wasn't there before! Please be sure to leave some kind of indicator as to who you were so I can find the winner! K?

Enjoy!
Michelle B.
"Queen of the Scene"

Tuesday, October 28, 2008

# 2 Today - If it doesn’t…..


…kill you, it makes you grow stronger. Right? I heard that in a song this morning. Oh, I struggle with color challenges and have been pretty successful at avoiding them. But, it’s time to recognize that if I don’t practice, I will never get better. So this is for color challenge CC190 and also sketch challenge Mojo58 (although I prolly should have framed out Glideabella to really follow the sketch). This image was a PIF from Blessingsx3 eons ago (Thanks Janette!)

I was just getting ready to upload my photo when I noticed that poor Glideabella only had one pony! Ha! I couldn’t find the other one so I had to remove the only one she had left. Sorry Glideabella!

OK, now how did I make this card....Oh, I don't know, I tried this and that. Actually started with Pirouette Pink as the background and realized I had the wrong shade of pink. So, let's see......I masked the "lake" and sponged Kiwi Kiss for the ground. Then I masked the ground and stamped the evergreens many times at different heights. I didn't like the white showing in the sky so I watercolored some Tangerine Tango into the sky area. Wasn't sure I liked the colors so I stamped snow and snowflakes in Whisper White. If all else fails, add glitter!

The large pink snowflake was cut with my Snowblossom punch and then snow was stamped on, the edges were sponged in Whisper White and then the glitter. I used a similar technique for the flower from the Boho Blossoms punch that is in the center of the snowflake. Then I added a pretty brad. As I'm looking at this now, I'm thinking I should have added some stamped small pink snowflakes throughout to pull it together a bit more.

Stamps: Stamping Bella Glideabella, Itty Bitty Backgrounds, Merry & Bright, Lovely as a Tree
Paper: Tangerine Tango, Pixie Pink, Whisper White
Ink: Whisper White, Kiwi Kiss, Tangerine Tango, Pixie Pink
Accessories: Copics, Prismacolor pencils & baby oil, glitter pen, Boho Blossoms punch, Snow Blossom punc
h

Enjoy!
Michelle B. aka “Queen of the Scene”

I Love Fall


I could stand in the pumpkin patch and look around all day. Some of what I saw is replicated in this card. These images were a PIF from SBS81 (Thanks Stephanie!)

I colored the images my usual way with Copics and Prismacolor pencils.

I did my usual Cut then Ink Technique to get my layers to line up. I brayered the sky. I sponged the entire ground area with Creamy Caramel ink. I used a torn piece of paper as a mask and sponged Close to Cocoa to create the little mounds of earth in the field.

Another little cloud experiment here….I drew the shape of a cloud, cut it out and used it as a mask. I sponged Whisper White ink very close to the mask (even used a trimmed makeup sponge to get a finer line of white ink) and then used the sponge to “smear” it down and to the right so that the cloud just faded off into the sky. (You can click on the picture to enlarge)


I cut the lower layers of corn stalks in half so I could angle them more and to get a thinner middle to “wrap” the twine around.

Stamps: Sweet N Sassy Happy Harvest
Paper: Tangerine Tango
Ink: Soft Sky, Baja Breeze, Whisper White, Close to Cocoa, Creamy Caramel
Accessories: Copics, Prismacolor pencils & baby oil, twine, Cricut


Enjoy!
Michelle B. aka “Queen of the Scene”

Monday, October 27, 2008

Outdoor Tree


Did you think I had vanished? Life is just hectic right now but Hooray! my husband is finally done traveling. Soccer and volleyball are almost over for the kids so things should slow down soon. I did get 3 cards done this weekend so I'll have some posts for you over the next couple of days.

On to today's card.....I completed this card the other night but thought it still needed something. When I woke up the next morning I had one of those AH HA! Moments. What it needed was the pieces of ribbon in the bird’s beaks. NOW its really done.

I colored the main images my usual way with Copics and Prismacolor pencils. I added glitter pen to the tree and ornaments.

I did a couple of little experiments on this card. I did my usual Cut then Ink Technique to get my layers to line up. I reversed my usual style: Instead of starting with white cardstock and adding color, I started with Soft Sky cardstock and added white. I also did a little experiment with the clouds – using a stamp to create a mask for the clouds (more below). I like the look of both.

To create the clouds, I first stamped a cloud and cut it apart (you can click on the pics to make them bigger).


Then I put the mask into position and stamped Whisper White ink trying to stay close to the mask. To blend, I used my sponge to pull the ink down and to the right. This makes the cloud fade away. Pretty cool I think!


Stamps: CC Designs Sugarplums Christmas Scene, CC Designs Olivia’s Birdies, CC Designs Sugarplums Scenery
Paper: Soft Sky, Riding Hood Red
Ink: Whisper White, Baja Breeze
Accessories: Copics, Prismacolor pencils & baby oil, glitter pen, Stickles, Cricut


Enjoy!
Michelle B. aka “Queen of the Scene”

Wednesday, October 22, 2008

Visions of Sugarplums


…dance in her head. Well I started out with sketch challenge Mojo57 but I think I ended up straying a ways from that. Sorry.

I was trying to accomplish the look of a little girl in her great big bed, all covered up, dreaming sweet Christmas dreams. I even tried to give the illusion of her tiny body under the turned down covers.

I colored Olivia and the sugarplum dreams my usual way with Copics and Prismacolor pencils. I added some glitter pen to the sugarplum dreams and smeared it with my finger to cover the entire image. I used Nesties to cut out the pillow and sponged some Pink Pirouette around the edges. I used a larger Nestie to cut the scalloped edge on the comforter. I used two different patterns of DP to give the illusion that her blankets were turned down. To show the shape of her tiny body under the covers, I stamped another Olivia and cut her out. I placed her into position over the first Olivia and traced her with a Prismacolor pencil. I then blended that line in with baby oil. I then cut the mats and assembled the entire card. I put the sugarplum dreams up on pop-dots.

Stamps: CC Designs Sugarplums Christmas Scene, CC Designs Pajama Olivia
Paper: Pink Pirouette, Riding Hood Red, Georgia Pacific 110, DP from Stampin’ Up
Ink: Pink Pirouette
Accessories: Copics, Prismacolor pencils & baby oil, Nesties, glitter pen, pop-dots


Enjoy!
Michelle B.
“Queen of the Scene”

Sunday, October 19, 2008

Hollywood Bday


First – clearly I need to learn how to photograph shiny things…sorry!

Today’s featured stamper, Ink-E, had this card in her gallery that gave me my inspiration. When I saw Ink-E’s card, it totally reminded me of this Hollywood idea I’ve had in my sketch book for a few days now.

I changed:
1. The words
2. The bright color (from pink to blue)
3. The sketch (I used SC191)

I did my usual Cut then Ink Technique to get my layers to line up. I used a torn piece of paper as a mask to separate the sky from the land. I brayered Pacific Point on the top. I sponged Black on the bottom. I also sponged some Night of Navy onto the top. I stamped the stars with my Virsamark pad and embossed with silver. I stamped the sentiment in Whisper White. The palm trees were stamped in black, colored in with Copics, and then a bit of white gel pen was added to hightlight. The “HB” was cutout on my Cricut and then a fine line of Copic gray went around some of the edges to shadow. I then assembled onto a piece of Whisper White Cardstock (are you shocked I used white?)

Stamps: The Stampin Place Palm Tree, Stampendous Many Messages, Holiday Tag Team
Paper: Whisper White
Ink: Pacific Point, Night of Navy, Black, Whisper White
Accessories: Copics, Silver embossing powder & versamark pad, Cricut, white gel pen


Enjoy!
Michelle B.
“Queen of the Scene”

Friday, October 17, 2008

Jungle Boogie


DD has been asking about being a nature photographer when she grows up so I thought this would be cute for her upcoming 10th birthday. And it made me think of that Jungle Boogie song (which has been stuck in my head all day) so this card is also for the October 2008: For a Song Central Theme Fan Club challenge.

These cute images were received from my PIF friends Anemone (Thanks Kelly!) and Photoholic (Thanks Shannah!) over at the PIF images thread. These girls have me really hooked on High Hopes and I’m proud to say I have placed my first High Hopes order! Yippee!

I colored the individual images my usual way with Copics and Prismacolor pencils. I then cut them all out. I wanted the jungle greenery to go all the way across the card and I didn't want poor Sheila to get lost in the jungle so I cut the jungle background into 2 pieces. Since these were simple cuts on my background and I wanted them to line up into certain parts of the images, I actually cut them after I inked them (unusual for me). The brown areas needed a little something so I drew in a few more rocks and some dots.

Stamps: High Hopes Sheila, Jungle Background, Jungle Leaf Corner, Hanna Stamps Things Hanna would say
Paper: Real Red, Whisper White
Ink: Blue Bayou, Baja Breeze, Creamy Caramel, Close to Cocoa, Versafine
Accessories: Accessories: Copics, Prismacolor pencils & baby oil, fine black marker

Enjoy!
Michelle B. aka “Queen of the Scene”

Thursday, October 16, 2008

How I Color

ETA: I have recently switched from using baby oil to Goo Gone. I find it blends better and leaves no residue that I have to wait to dry. 2/18/09

I've been promising for a while to give you some info on how I color. I haven't had time to make a card with my DH out of town for 12 days so I thought I could at least get this done. I first heard about coloring with both Copics and Prismacolor pencils on one of my favorite blogs. You can find the entry here.

At the time I read this, I owned about 30 Copic markers. I felt like I had learned how to use them to get the shading I wanted, however, I just didn't have enough colors and couldn't buy them all right now! Ha! This technique allowed me to get all the shading I wanted, not have to own every Copic just yet, and get the fully colored in look of a Copic (not the rougher look of just a Prismacolor pencil).

This is long so just look at the pictures if you want the shortened version!

So, here we go:

First I quickly color in the image using one color Copic marker per area. Because I'm not doing all the scrubbing and blending with the Copics, I do not worry about what type of ink the image was stamped with. Most of the time I just use my Versafine ink pad and Georgia Pacific Cardstock. I also receive a lot of images through trades so I don't know what type of paper and ink were used. I do try to avoid coloring over the black lines...just color right up to them without going over. It is better to go with the lightest shade of the color that you can here. We can darken it later.
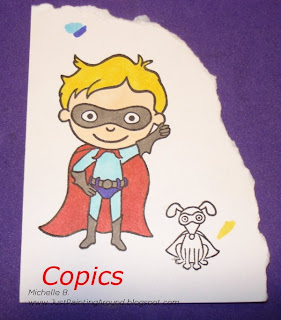


Now for the best secret yet......I spray my image with a squirt of acrylic sealer. I heard this somewhere on SplitCoastStampers but cannot find the original post. I'd love to thank the person and give them proper credit so do tell if you know where I read this!

The sealer dries in just a minute and makes the surface of the paper perfect to blend with Prismacolor Pencils & baby oil. This step is not required and sometimes I do skip it but I'm always happier with my results when I use the sealer. Give it a try sometime!

After that, I roughly add some Prismacolor pencil in all the areas I want to shade. Sometimes I go all around the area (like Billy's hair) and other times I just darken the areas that I want to shadow (like on Billy's cape). Don't be afraid to break the rules here.....you don't need to shade with the same family of color that you markered in. For example, I Copic'd Billy's hair in yellow and Prismacolored in brown. Giving him that sandy blond hair look. I usually Prismacolor in red on my orange Copic'd pumpkins. For black areas, I Copic in medium to dark gray and Prismacolor in the black.
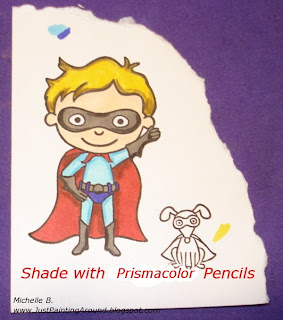


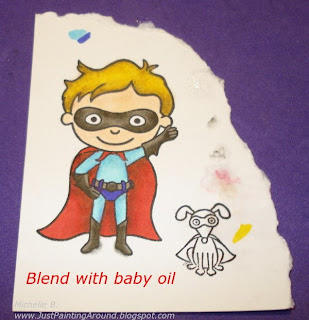
Next, I use baby oil gel (less messy than regular baby oil) and stumps to blend the Prismacolor pencil in. It's also fun to add a 2nd color of Prismacolor pencil in here as well.


And the final, but very important step, is to add white highlights using the white Prismacolor pencil. This is especially important on darker areas (like Billy's cape) or areas you want to be shiny (like shoes).
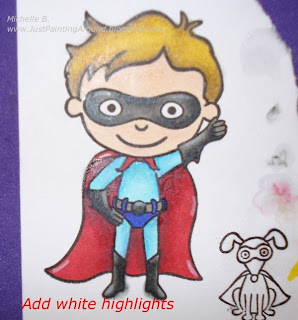


Sorry that last image was a little rotten, that baby oil was really shining! You may notice that I have baby oil and Copic marker all around the edges of my image. I almost always cut my main image out so the area around him is scratch paper for me to wipe off my stumps or test colors.

You can see this image in his finished card here.

So, now you know.

Enjoy!
Michelle B
"Queen of the Scene"

Tuesday, October 14, 2008

The Pumpkin Patch


Today I made a double challenge card. This is for the Mojo56 sketch challenge (love these!) and HHC3 challenge to use stitching. We went to the pumpkin patch this weekend and I just had to make something from all the beauty I saw there.

This cute main image was received from LMcAree (Thanks Lori!) over at the PIF images thread.

(I thought about calling this the Stinky Stiches card. Clearly this isn’t my best skill! Ha!)

I did my usual Cut then Ink Technique to get my layers to line up. For the “dirt” I first sponged the area with Creamy Caramel. I then used a couple of torn pieces of paper as masks and sponged along the edges with Close to Cocoa. To make the pumpkins appear to be tucked in the dirt, I just roughly cut the bottoms off and placed the bottoms up against a dark part of the dirt. The clouds are just a tiny piece of sponge dipped in Whisper White ink. First I dab the top edge of the cloud shape. Then I use the sponge to pull the color down and to the right on the bottoms (smeared).


Stamps: High Hopes Wagon Full of Blessings, Loads of Love Accessories, CC Designs Sugarplums Halloween, Rubernecker Kittie Kit Cause a Scene Out Door Master
Paper: Whisper White, Tangerine Tango
Ink: Soft Sky, Whisper White, Old Olive, More Mustard, Tangerine Tango, Close to Cocoa, Creamy Caramel
Accessories: Copics, Prismacolor pencil & baby oil, paper piercer, fine black marker


Enjoy!
Michelle B.
“Queen of the Scene”

FS88 Snowy City


I was excited to see this week's featured stamper. Anne Ryan has left kind comments on many of my cards. Now it's my turn to honor her! Sorry I'm a little late.

I choose to case this card. I changed:

1) the stamp set however I kept with the little buildings theme
2) I added red to the overall design
3) I changed up the sketch a bit

I was inspired by two others today as well. I've been wanting to add snow to my images like Kittie does. I admit I had to take a really deep breath before I stamped that white over the top of my sky and buildings. Now, I love the look. I was also inspired by Michelle to try to do Christmas cards for my challenges. What a great idea to have fun while "getting the job done".

Although its difficult to see. I added little snow drifts by sponging some bashful blue near a mask of torn paper. Then I drew a line of glitter pen over the drift and smeared it with my finger. Here's a close up:


Stamps: Lizzie Anne Designs Holiday Lane, Itty Bitty Backgrounds, Snowfall
Paper: Whisper White, Real Red, Bazzill Black
Ink: White, Bashful Blue, Blue Bayou, Not Quite Navy
Accessories: Copics, Prismacolor Pencils & Baby Oil, Ribbon from Mike's, Glitter pen


On a different note, you know your style is really becoming prominent when you 6yo DS picks up on it. He drew me a picture the other day and divided his scene up like I always do. He even used red which is my favorite color to layer with. How cute!


Enjoy!

Michelle B.
"Queen of the Scene"

Friday, October 10, 2008

Hello from St Louis


I promised a friend (Hi Cyndee!) that I'd send her son a card for a recent accomplishment. He is interested in geography and loves to learn about different places. So, I said I'd make him a card about my home town, St. Louis. I've been dreaming for weeks about all the awesome things I could put into this card....so much so that I lost site of COMPLETING the project. Today's challenge was just the "kick in the pants" I needed to simplify my design and get moving on this.

The "arch" is hand cut from metallic silver paper. I was trying to feature St. Louis's Arch, awesome zoo, and professional baseball team.

Stamps: My Favorite Things Can Ya Dig It, MFT It's a Jungle Out There, MFT Going Places, Lots of Thoughts, All in the Family Accessories, Rubber Stampede Mirror Image Stamp
Paper: Riding Hood Red, Whisper White, Metallic Silver (from Mike's)
Ink: Soft Sky, Baja Breeze, Old Olive, Kiwi Kiss
Accessories: Copics, Prismacolor Pencils, Fine black marker


Enjoy!
Michelle B.
"Queen of the Scene" (look, I got really brave today and put that title on my SCS post today too!)

Thursday, October 9, 2008

A Link for High Hopes Blog Candy

In case you haven't seen, there are High Hopes stamps being offered as blog candy here. Don't miss it!

Michelle B.
"Queen of the Scene"

A Gift For You


Don’t you just love the water on this little guy’s toes? Here we have a double challenge card for sketch challenge SC197 and High Hopes Challenge # 2 (use blue, green, brown). I normally don’t do color challenges because I just can’t do a scene with so few colors. Because this one just said “blue” instead of a particular blue, I felt that I could do a variety of blues and complete the scene.

This cute image was received from Anemone (Thanks Kelly!) over at the PIF images thread.

I did my usual Cut then Ink Technique to get my layers to line up. The Easy Sunset Technique was used for the sky. Everything else is sponged and stamped.

Stamps: High Hopes Froggy Gift, Papertrey Ink Pond Life, The Stampin Place Water Ripples
Paper: River Rock, Whisper White
Ink: Blue Bayou, Night of Navy, Kiwi Kiss, Old Olive, Always Artichoke, Black, Chocolate Chip, Soft Sky, Baja Breeze, Pacific Point
Accessories: Copics, Prismacolor pencil & baby oil, white gel pen


Enjoy!
Michelle B.
“Queen of the Scene”

Tuesday, October 7, 2008

Blingy Witch


Did you think I was gone? I didn't know if I was ever going to find time to make a card but finally today I stole a few minutes. This was created for the Our Creative Corner challenge to use bling. And I've been yearning to color this fabulous witch. So, I created this card with "magic bling exhaust fumes" spewing out from behind her!

These little stars were a RAK from Anemone (Thanks Kelly!).

To create that night sky, I first cut those two angled cuts into my Whisper White cardstock and stuck them to my sticky Cricut mat to hold them in place while I inked (see my cut then ink technique here). Note: I left those two gaps open when the pieces were on the mat. Next I cut out a "moon" circle of Soft Sky cardstock and held into into position on the Whisper White cardstock pieces and lightly traced around it with a pencil. I then removed the Soft Sky "moon" and set it aside for later. With sponges, I inked around that "moon" pencil line using swirling motions and blending the colors together where they met. Starting at the center of the moon, I used Soft Sky, then Cool Carribean, Pacific Point, Night of Navy and finally black. Finally, I added my bling and adhered my "moon" and witch to the Green Galore cardstock.

Stamps: CC Designs Sugarplums Halloween, Autumn Leaves Swirls V I
Paper: Green Galore, Whisper White, Soft Sky
Ink: Whisper White, Soft Sky, Cool Carribean, Pacific Point, Night of Navy, Black
Accessories: Virsmark Pad, Heat & Stick Powder, Dazzling Diamonds, Stars from unknown maker, Copics, Prismacolor Pencils & Baby Oil


Enjoy!
Michelle B.

PS: My friend Janette has dubbed me "Queen of the Scene". I really liked that title but have been chicken to use it (wondering if I'm up to it). So, let me take a deep breath and have some guts and try this again.....

Enjoy!
Michelle B.
"Queen of the Scene"

Friday, October 3, 2008

Tagged


I was tagged twice recently so here are 7 random facts about me:

1. I LOVE chocolate chip cookie dough…that’s right, don’t bother cooking it!
2. I have a Masters Degree in Information Systems and currently work part time in that field.
3. My husband and I work together. We actually met at work. We often work very closely such as on the same project, or reporting to the same boss, or sometimes I do work that is ultimately for him. We make a great team (but the kids are probably tired of hearing about work at the dinner table!)
4. I am a huge animal lover…especially dogs…especially Boxers (I've owned 2) and Boston Terriers (That's my sweet Fiona pictured above).
5. I don’t eat a lot of meat – See Number 4. I’d probably be a vegetarian if it wasn’t for my husband and kids.
6. I’m deathly afraid of flying. My husband suggested we fly to Florida last summer and I had a bad dream that very night just from the mere suggestion of it.
7. I have trouble with things like this that I’m supposed to pass on. I don’t want to “bother” anybody. Don’t know why I feel that way because I liked being tagged. So here I am stuck…..any volunteers?

PS: We’ll save the discussion of my radical taste in music for another day!

Fishy Birthday


A triple challenge card….Weekend Sketch Challenge WSC60, the High Hopes Challenge # 1 to create a birthday card with brads (mine are the “bubbles”) and I challenged myself to make a card in 60 minutes (ok, ok, it was really more like 70 but that’s ok). There was soooo much more I would have liked to add to the ocean and sand but I had to make myself quit! Of course, it will say "Birthday Fishes" inside!

These lovely images were received from LMcAree and TamiJo (Thanks Lori & Tami!) over at the PIF images thread.

I did my usual technique of cutting and then inking to ensure everything lines up properly. I used the Easy Sunset technique to make my water. The water looked a little flat so I embossed just the water area with my D’Vine Swirls embossing folder (using great restraint here not to add more images to the water and sand!). The sand was hand drawn with a fine black marker and shaded with Creamy Caramel. The images are colored with Copics & then Prismacolor Pencils & baby oil (I'll be posting a tutorial on that soon). On the Sea Horse, I colored over the lines with a glitter pen and then smeared it with my finger to give him that shiny fishy texture. Then it was time to stick everything into place!

Stamps: High Hopes Coral One, High Hopes Horatio Sea Horse, High Hopes Starla Starfish
Paper: Pink Pirouette, Whisper White
Ink: River Rock, Creamy Caramel, Pacific Point, Baja Breeze
Accessories: Copics, Prismacolor pencil & baby oil, D’Vine Swirls Cuttlebug embossing folder, glitter pen, fine black marker, brad from an unknown source


Enjoy!
Michelle B.

Jeff’s Bday #2


This was inspired by a photo I saw on the internet of our local motorcycle shop. I thought the HB (for Happy Birthday) instead of HD (for Harley-Davidson) was kinda funny!

This motorcycle image was received ages ago from SF9erFan (Thanks Michelle!) over on the PIF images thread.

The “corrugated metal roof” is metallic silver paper I ran thru the crimper. The “window” is watercolor paper with some River Rock ink applied loosely in a diagonal pattern with my aquapen (keeping the center lighter than the edges). I tried a couple of colors before I decided on River Rock. It gave the warm and well lit feel I was looking for. The “sidewalk” was Going Gray ink in the center and then I worked in some black ink around the edges. Again, I kept the center light up against the building so it would appear the light of the building was spilling out a bit onto the sidewalk. I also drew the “cracks” in the sidewalk with my fine black marker and my usual sidewalk technique.

Now I said I was going to let DH vote on which card to send but I’ve changed my mind...this one is DEFINITELY the right one to send!

Stamps: Motorcycle unknown, HB was a TAC freebie with purchase
Paper: Tangerine Tango, Black, Watercolor, Silver metallic paper from Mike’s
Ink: Black, Going Gray, River Rock
Accessories: Copics, Aquapen, fine black marker, crimper,


Enjoy!
Michelle B.

Thursday, October 2, 2008

Fall Apples


Catcrazy (Thanks Janice!) sent me this fabulous image from the PIF images thread. This image was soooo fun to color and just perfect for challenge SC196.

Sometimes when I’m done playing out my idea for a card, I still think it needs just a little something. A few swirls like these often does the trick!

Stamps: Northwoods Apple Basket, Autumn Leaves Swirls V I, Stampendous Many Messages
Paper: Riding Hood Red, Whisper White
Ink: Baja Blue, Soft Sky, Old Olive, Always Artichoke
Accessories: Copics, Prismacolor Pencils & Baby Oil, White Gel Pen, Fine black marker


Enjoy!
Michelle B.