
Did you miss the Black Friday sales at FireCracker Designs by Pamela? That's ok cause you can have another chance on Cyber Monday!
This code will be good for 30% off
everything IN STOCK in the store
(sorry, digi's are not part of the store).
This code is good starting at midnight EST November 29th, 2009, and ends at midnight EST November 30, 2009. OK, here's the code:
code: CYBER30
(feel free to share the code!)
Enjoy!
Michelle B.
Sunday, November 29, 2009
FS147 Masculine Bird
 Congrats to MrsBoz for being today’s featured stamper! I choose this card to CASE. I've been wanting to do a natural bird card and I liked the blue and textured kraft on this one.
I changed 1) the sketch to the C4C12 sketch from last week 2) removed the embellishments for a more masculine look and 3) I changed the color scheme to remove the yellow and just stay with blues and browns.
I used punches for the sentiment to qualify for the C4C13 punch challenge (hey, that’s a lot of layers and punches on one card for me!)
One of my favorite things about this card (besides how the main image panel turned out!) was the embossing. When I put the kraft into the embossing folder, I also placed the striped DP layer in there. Then I embossed. I liked it so much I decided to show it off a bit by sponging all the leaves lightly with chocolate chip!
Stamps: Touch of Nature, Hanna Stamps Things Hanna Would Say
Paper: GP110, Papertrey Kraft, Bordering Blue, Chocolate Chip, Basic Grey Granola
Ink: River Rock, Creamy Caramel, Chocolate Chip
Accessories: Prismacolor Pencils, Goo Gone (for blending), Leafy Branch Embossing Folder, Word Window Punch, Modern Label Punch
Enjoy!
Michelle B.
“Queen of the Scene”
Saturday, November 28, 2009
16th Year of Ornaments - Manger
 This is the 16th year I have made Christmas ornaments. I wanted to do these microscope slide ornies this year but was having trouble finding/deciding on an image appropriate for a 1.5" x 1.5" ornament. Digi's to the rescue! This is a digital image from FireCracker Designs by Pamela called Away in a Manager. Because it is digital, I was able to scale it perfectly to my needs.
I colored it with Copics, masked the "sky" off and sponged 2 shades of brown for the floor. Then I masked the "floor" and baby off and sponged in 3 shades of blue for the sky. All that was left to do was assemble the parts. Now just 34 more to make!
NOTE: Be sure to place your FireCracker Designs by Pamela orders early! They will be closed from December 15th to the first of the year.
Stamps: FireCracker Designs by Pamela Away in a Manager
Paper: GP110
Ink: Creamy Caramel, Chocolate Chip, Baja Breeze, Blue Bayou, Not Quite Navy
Accessories: Copics, Glitter pen, Ribbon from Pink Hedgehog, microscope slides, red line tape, microbeads
Enjoy!
Michelle B.
Thursday, November 26, 2009
Sparkly Tree
 Happy Thanksgiving! I gotta tell you about the big Black Friday Sale over at FireCracker Designs by Pamela:
Sale ONE: All rubber 50% off : Friday 6am-10am EST Use code: TG50
Sale TWO: All clear 30% off: Friday 10am-2pm EST Use code: TG30
Sale THREE: All Shimmerz & Flower Soft 30% off : Friday 2pm-6pm EST Use code: TGSHIFL
In stock items only.No combining coupons, no combining shipping.
PS: Did you know FCD has a Wish List option? Fill your wish list today with the items you want, and send hubby the link with the coupon codes & times so he can do his Christmas shopping for you!
OK, on to the card....I'm going all sparkly here! I love this new tree from FireCracker Designs by Pamela's Duck the Halls set. Once again, Pamela has provided this fab image in a variety of sizes in this set. Great versatility!
I stamped the image and colored it with Copics. I sponged a sky in the background. Now on to the bling.....The snow is accented with glitter, the ornaments are covered in Glossy Accents, the star is accented with a glitter pen, the dp is accented with a glitter pen, and the stripes are red line tape covered in glitter (oh what a mess I made!).
Stamps: FireCracker Designs by Pamela Duck the Halls
Paper: GP110, SU DP, Old Olive, Baja Breeze
Ink: Baja Breeze, Always Artichoke, Momento Tuxedo Black
Accessories: Copics, glitter pen, Glossy Accents, Red Line Tape, Glitter from Mike’s
Enjoy!
Michelle B.
“Queen of the Scene”
The Nutcracker
Happy Thanksgiving!!!
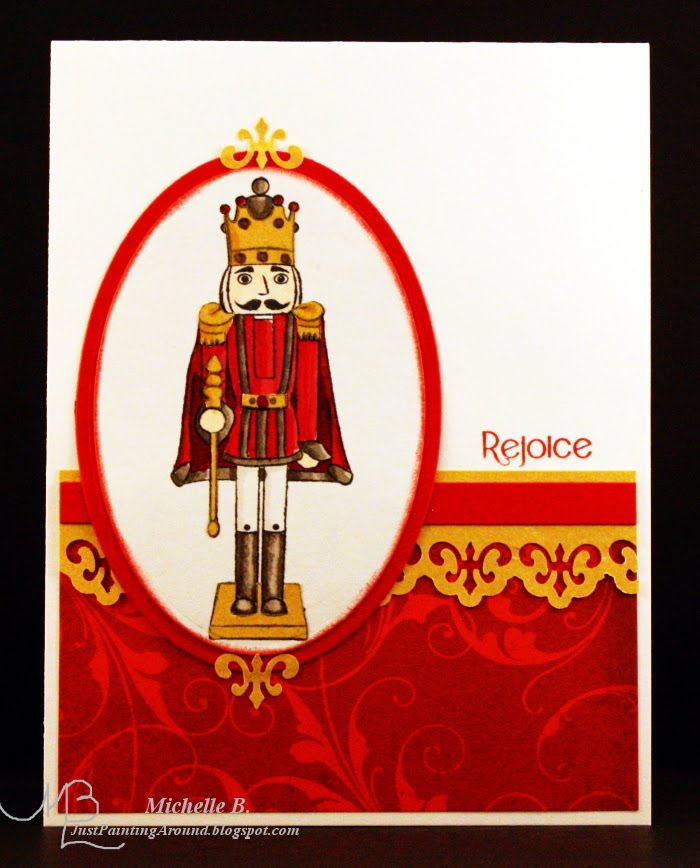
I have a family member who collects nutcrackers so when I saw this image from Clear Dollar Stamps, I had to have it!
I used the sketch from Clear Dollar Stamps' challenge this week and I went for a CAS approach to let the image really shine! All the gold parts of the image are paper pieced in and shaded with a bit of Copic marker. When I use punches, I often think the parts you are supposed to throw away look kinda cool. Here I found a use for them by adding them to the top and bottom of the main image panel. (man I wish I could take a better picture !!!!)
Stamps: Clear Dollar Stamps Holiday Nutcrackers
Paper: GP110, Papertrey White, Real Red, Gold from unknown source, DCWV DP
Ink: Riding Hood Red, Momento Tuxedo Black
Accessories: Copics, Nesties, EK Success Fleur de Lis punch
Enjoy!
Michelle B.
"Queen of the Scene"
Wednesday, November 25, 2009
Bunny Love with Chipboard
 The new Think INK challenge from Artful INKables is to use chipboard. You can find all the details here. Hope you'll play along!
 The bunnies are from a new set by Artful Inkables called Creature Comforts. I thought this image was rather versatile and could be a child/parent or a husband/wife.
I stamped these cute bunnies and colored them with Copics. I masked their feet & the horizon line and sponged in the grass. I used Mother Mark's cloud tutorial for the sky. I didn't like the bright white against the DP so I sponged some River Rock just roughly across the white areas to tone them down just a bit. The chipboard curves accenting the image are covered with coordinating DP.
Stamps: Artful INKables Creature Comforts
Paper: GP110, Basic Grey DP, Chocolate Chip
Ink: Baja Breeze, River Rock, Old Olive, Chocolate Chip, Momento Tuxedo Black
Accessories: Copics, SU ribbon, chipboard from my LSS
Enjoy!
Michelle B.
“Queen of the Scene”
Monday, November 23, 2009
And the winner is........

Jackie!!!!!!
Jackie has one the Let's Celebrate set from FireCracker Designs by Pamela!
Congrats Jackie and I'll be emailing you for your addy!
Michelle
Sunday, November 22, 2009
FS146 Christmas Window & Window Ledge Tutorial

NOTE: There is still time to enter to win the FireCracker Designs by Pamela blog candy. Just visit this post.
Congrats to Birgit (Biggan) for being today’s Featured Stamper! My favorite things in Birgit’s gallery are the landscapes and windows so I chose this card to case. I changed 1) the color scheme adding more color 2) the details on how the window was made 3) the stamps although I kept the same theme.
I know its not Tuesday but would you like the Tips, Tricks, & Tutorial on how I made that window ledge? I bet you will so here we go!
 First, I cut a rectangle of cardstock the approximate size of my window. Then I scored 1/4" up from the bottom and then again 1/8" above that. Next I cut 1/4" off each side down to the score line on each side. I cut at an angle from the first score line up to the second score line on each side.
 Then I mask the main window area and below the 1/4" score line and sponged a little darker color into that area. Remove the masks and its ready for your window scene to be placed in.
I always make my scenes on a whole piece of paper and then cut the 1/8" strips out. NOTE: I do not just cut once and spread the pieces as I like the part of the image to be missing just as it would if it were obscured by a window structure.
Stamps: Magnolia Tilda in Winter Stockings, Rubbernecker Kitty Kits Cause a Scene The Moose is Loose, A Muse Santa’s Silhouette
Paper: Whisper White, GP110, Old Olive, Kraft, DCWV DP
Ink: Soft Sky, Baja Breeze, Blue Bayou, Not Quite Navy, Creamy Caramel, Momento Tuxedo Black
Accessories: Copics, Prismacolor Pencils
Enjoy!
Michelle B. "Queen of the Scene”
Thursday, November 19, 2009
FCD November Blog Hop & BLOG CANDY!!!

Welcome to the November Firecracker Designs By Pamela Blog Hop! This month's theme is "Thank You." And to thank YOU, Pamela has given each member of her design team a stamp set as blog candy!!! Whoo Hoo! I'm offering the wonderful sentiments set Let's Celebrate.

NOTE: The official start time of this Hop is Friday, at 8:00 AM (EST). If you arrived early, please be patient as all the links may not be live yet.
This is a “circular blog hop” where the only beginning is wherever you start!! You will know you are at the end of your blog hop when you’ve come back to the blog you’ve started from! (It’s not a huge circle…so it should be easy to remember where you started.) Each member of the design team will be offering a stamp set as blog candy so you’ll want to leave a comment on EVERY blog, so you don’t miss out! (hop ends at 8:00 pm (EST) on Monday)
**To find out if you’ve won… you will be contacted via e-mail (so be sure to leave it with your comment.) **
Now, to continue the circle, you will need to hop on over to
SHELLY'S BLOG!!!!
Deets on this card: I masked off the snow area with a torn post it note. I used the brayered sky technique to color this sky. The sentiment was cut out using my Cricut. This cute little snowman was stamped, colored with Copics, and adhered into place with his little hand holding up the words. I added a little scallop edge and strip of DP to the top and bottom and Voila!
Stamps: Firecracker Designs by Pamela Shepherd Snow Family
Paper: Not Quite Navy, DCVW DP, Whisper White, GP 110
Paper: Not Quite Navy, DCVW DP, Whisper White, GP 110
Ink: Baja Breeze, Blue Bayou, Not Quite Navy, Momento Tuxedo Black
Accessories: Copics, Cricut & Storybook cartridge, scallop edge punch
Accessories: Copics, Cricut & Storybook cartridge, scallop edge punch
Enjoy!
Michelle B. aka “Queen of the Scene”
Designer for FireCracker Designs by Pamela
Wednesday, November 18, 2009
Santa Duck
 Now, I don't normally start my posts with a closeup but I love this little tag so much that I just had to make sure you saw this first! I used the Faux Metal technique to create this. I was worried it would stick to my stamp and ruin it but....Don't worry! If any sticks to the rubber, it peels right off. Hope you like this tree because I've got more coming with this cute image over the next few weeks! OK, now on to the rest of the card:
 This new image from FireCracker Designs by Pamela reminded me of some Christmas Ornaments I have from "that place with the famouse mouse" so I wanted it to appear he was hanging off a tree branch. I used my branch punch to create the branch and just added a bit of copic color for interest. I got this idea from my frend Deb. The sketch is from Mojo113.
Be sure to come back tomorrow for an extra special FireCracker blog hop!
Stamps: FireCracker Designs by Pamela Duck the Halls
Paper: Real Red, So Safron (yep, its there….more on that later!), DCWV DP
Ink: So Safron, More Mustard, Old Olive, Momento Tuxedo Black
Accessories: Nesties, gold embossing powder, Versamark pad, gold ribbon from Pink Hedgehog, Swiss dots embossing folder, Martha Stewart Branch Punch, Copics
Enjoy!
Michelle B.
“Queen of the Scene” (when I have time! Ha!)
Penguin Tag

There is still time to enter the Artful INKables tag challenge and maybe win some free stamps! Check out the details here. This is my sample to get your creative juices flowing!
I'm featuring a new set from AI called License to Chill. Just the name is fun, right?!?! All the patterns behind this tag were made from the set. I used the License to Chill sentiment on the top and the snowflakes for the bottom portion. My Cricut was used to cut out the tag and the tag mat. Then I stamped this litle fella and colored him with Copics. I sponged in a blue sky and added a few white snowflakes in the sky. A few ribbons, and I'm done!
Stamps: Artful INKables License to Chill
Paper: Baja Breeze, Pacific Point, GP 110
Ink: Baja Breeze, Pacific Point, Momento Tuxedo Black
Accessories: Cricut & Tags Bags and More cartridge, blue ribbons from Pink Hedgehog, sparkle ribbon from an unknown source, scallop edge punch
Stamps: Artful INKables License to Chill
Paper: Baja Breeze, Pacific Point, GP 110
Ink: Baja Breeze, Pacific Point, Momento Tuxedo Black
Accessories: Cricut & Tags Bags and More cartridge, blue ribbons from Pink Hedgehog, sparkle ribbon from an unknown source, scallop edge punch
Enjoy!
Michelle B.
“Queen of the Scene”
Sunday, November 15, 2009
My first AI Blog Hop!

Welcome to the Artful INKables blog hop! If you haven’t come here from Holly's blog, then you will want to start at the AI Blog so you don’t miss anything along the way, and be sure to follow us all the way to the end because you never know what you’ll find at the end!!
Today, I’m showing you a card made with a new set called License to Chill. I used this cute little bear sledding as the focal point in this vintage style, cracked glass ornament (sorry, I just discovered I like vintage and I'm kinda stuck on it right now! Ha!). Aren't those snowflakes fabulous! Here's a closeup:
Today, I’m showing you a card made with a new set called License to Chill. I used this cute little bear sledding as the focal point in this vintage style, cracked glass ornament (sorry, I just discovered I like vintage and I'm kinda stuck on it right now! Ha!). Aren't those snowflakes fabulous! Here's a closeup:

Stamps: Artful INKables License to Chill
Paper: Soft Suede, Riding Hood Red, Very Vanilla
Ink: Creamy Caramel, Chocolate Chip
Accessories: UTEE, Versamark, clear detail embossing powder (just the snowflakes), Copics, D’Vine Swirl embossing folder, embroidery floss (tassel), white prismacolor pencil (highlight on the tube)
Paper: Soft Suede, Riding Hood Red, Very Vanilla
Ink: Creamy Caramel, Chocolate Chip
Accessories: UTEE, Versamark, clear detail embossing powder (just the snowflakes), Copics, D’Vine Swirl embossing folder, embroidery floss (tassel), white prismacolor pencil (highlight on the tube)
Enjoy!
Michelle B.
"Queen of the Scene"
Michelle B.
"Queen of the Scene"
Friday, November 13, 2009
Wagon o' Presents

I love versatile images such as this! She’s supposed to have a pumpkin in her wagon but I “converted” her to a Christmas image by covering up the pumpkin with presents!
Stamps: CC Designs Sugarplums Pumpkin Emma, CC Designs AmyR Build A Holiday
Paper: Whisper White, Always Artichoke, Old Olive, Basic Grey Wassail DP
Ink: Creamy Caramel, Riding Hood Red, Chocolate Chip
Accessories: Copics, Always Artichoke ribbon
Enjoy!
Michelle B.
“Queen of the Scene”
Thursday, November 12, 2009
TESC90 Cracked Glass Snowman

I’ve been wanting to try the cracked glass technique. Well actually, I wanted to try it on the vintage snowman card I made the other day but I just couldn’t bare to risk it cause I was so happy with how I colored him. I purposely colored this snowman a little simpler so I would have the guts to give this a shot. Result: WAY FUN! I'm going to have to invest in the UTEE so I can really get some dramatic results with this. (Using clear detail embossing powder gave me more subtle results.)
I stamped the snowman from the new Shephard Snow Family set from FireCracker Designs for Pamela . (Thanks Shelly for pointing out that I could put images in his little twig hand!) He is colored with Copics and I added some glitter pen to his star. I sponged browns around him. Then I embossed clear over him at least 4 times (I lost count!). After he had cooled a bit. I folded him and cracked the embossing.
I stamped the snowman from the new Shephard Snow Family set from FireCracker Designs for Pamela . (Thanks Shelly for pointing out that I could put images in his little twig hand!) He is colored with Copics and I added some glitter pen to his star. I sponged browns around him. Then I embossed clear over him at least 4 times (I lost count!). After he had cooled a bit. I folded him and cracked the embossing.
Stamps: FireCracker Designs by Pamela Shephard Snow Family
Paper: Whisper White, Riding Hood Red, Baja Breeze, Soft Suede, Cosmo Cricket DP
Ink: Creamy Caramel, Soft Suede, Bravo Burgundy, Momento Tuxedo Black
Accessories: Versamark pad, clear detail embossing powder, glitter pen, Copics, Snowflakes embossing folder, ribbon from Pink Hedgehog, Nesties
Enjoy!
Michelle B.
“Queen of the Scene”
Wednesday, November 11, 2009
SC254 In the Moonlight & BIG NEWS!

First off....did you see this? Yep, that's right. I'm joining the design team for Artful INKables. I'm so excited! Although my official debut isn't until the blog hop on the 15th, I had to use some of my AI stamps for today's sketch challenge on SCS.
When I saw that nice large element in the center of today’s sketch, it just cried out to me for some brayering! I’m experimenting with different color combos for the sky as I get tired of doing blue all the time. I love purple so I've been trying to use it more often.
The leaves and flowers were first inked with Versamark and then Going Grey ink before I stamped them on the paper. They were then embossed with clear detail embossing powder. I punched out a circle to use as a mask and placed it a little above center (putting it right in the center would have been boring!). I brayered on first Almost Amethyst. When I was getting ready to put on my last "coat" of Almost Amethyst, I removed the mask so that just a bit of that color would be in the moon. I replaced the mask and next I brayered Perfect Plum (not going all the way to the center) and Elegant Eggplant (staying pretty close to the center). Reducing how far in I brayered with each darker color gives me that wonderful graduated color.
Stamps: Artful INKables Plant Prints
Paper: Whisper White, Elegant Eggplant, Basic Grey
Ink: Going Grey, Almost Amethyst, Perfect Plum Elegant Eggplant
Accessories: Versamark pad, clear detail embossing powder, post it note for moon mask
Enjoy!
Michelle B.
“Queen of the Scene”
Sunday, November 8, 2009
FS144 Christmas Birdhouse

Boy, I really wanted to case the pics of today's Featured Stampers's craft room by organizing mine but didn’t think I could get that done today! So, I choose this card to case. I kept all the blue and the birdhouse but changed out the sketch for the OCCC sketch this week, I changed this to a whole winter scene and I added some red. Since I used this older stamp set, I can also enter this in the All That Scraps Wednesday challenge.
This card has been finished for hours....but I really struggled to get a good pic. I finally just made myself go with this one!
Stamps: CC Designs Sugarplums Spooky Scenery, CC Designs Sugarplums Olivia’s Birdies, CC Designs AmyR Christmas Sentiments
Paper: Blue Bayou, Soft Sky, Stampin’ Up DP, GP 110
Ink: Blue Bayou, Whisper White, Momento Tuxedo Black
Accessories: Copics, Round tab punch, liquid appliqué, Winter Wonderland embossing powder, fine black marker, SU ribbon
Enjoy!
Paper: Blue Bayou, Soft Sky, Stampin’ Up DP, GP 110
Ink: Blue Bayou, Whisper White, Momento Tuxedo Black
Accessories: Copics, Round tab punch, liquid appliqué, Winter Wonderland embossing powder, fine black marker, SU ribbon
Enjoy!
Michelle B.
“Queen of the Scene”
Friday, November 6, 2009
Technique Trout

The current Artful Inkables challenge is to try a technique you hadn’t tried before. I don’t think I’ve ever used by Nesties to emboss a shape into a card like this before so I thought I’d give it a whirl. I love this fish half in and half out of the water. The embossed frame around him kinda gives him a fish tank feel! Ha!
I embossed the shape and kept the Nestie in place to mask the edge. Then I stamped my image into place using my stamp-a-majig for guidance. I colored the fish. I stamped the image again on some Eclipse tape and added and removed portions of the mask to sponge in the sky and water (hmmmm….I feel another Tuesday Tip coming on about how I did this water….). A little smear of ink dictated the ribbon placement (ha!). The finishing touch was the little “hi!” in the corner.
Stamps: Aftful Inkables Pond Friends
Paper: Papertrey White
Ink: Momento Tuxedo Black, Pacific Point, Baja Breeze
Accessories: Copics, Nesties, Eclipse Tape, Stamp-a-majig, ribbon from Pink Hedgehog
Enjoy!
Michelle B.
"Queen of the Scene”
Thursday, November 5, 2009
My First Vintage

The OCCC challenge for this week was to do a card in Vintage style. I’ve never tried vintage before. I even had to do a bit of research to figure out the common elements of Vintage style. In the end, I was surprised to find out that I LOVED this style!
I thought this vintage style would be a good match for my new Shepard Snow Family set from FireCracker Designs by Pamela. Don't you love those snowmen! I used the sketch from Mojo111 (upside down).
Stamps: Shepard Snow Family by FireCracker Designs by Pamela
Paper: Very Vanilla, Riding Hood Red, Creamy Caramel, Chocolate Chip, Basic Grey Wassail DP
Ink: Chocolate Chip, Creamy Caramel
Accessories: Copics, Martha Stewart snowflake punch, ¼” circle punch, Martha Stewart Scallop dot punch (for the small circles), Textile Texure embossing folder
Enjoy!
Michelle B.
“Queen of the Scene”
Wednesday, November 4, 2009
SC253 Do you like my grass?

Do you like my grass? I have been wanting a grass punch for a while but couldn’t find one. Then I got to looking at my icicle punch and…..yep, it looked like grass to me! Don’t throw away the small parts that are punched out either. I trimmed those and placed them in the foreground for more texture.
Ooh, I love the sketch for today’s sketch challenge! I’ll definitely be using this again! I was so glad it was a simple sketch because I was up way to late last night! Ha! No sponging, inking, airbrushing or anything for me here....this entire scene was made with dp & cardstock.
Stamps: CC Designs Swiss Pixies Birgitta
Paper: GP 110, Old Olive, Pumpkin Pie, So Safron, American Crafts DP (clouds), Cosmo Cricket DP (plaid)
Ink: Momento Tuxedo Black
Accessories: Copics, Martha Stewart Icicle Punch (grass)
Enjoy!
Michelle B.
“Queen of the Scene”
Tuesday, November 3, 2009
TTTT # 18 - Faux Brads
Time for another Tips & Tricks (and Tutorials) Tuesday! I haven't done any of these in a while and I have a few ideas brewing in my brain again so here we go. Today I'll show you how I make faux brads. These ideas were gathered from combining a number of other resources I saw on the web. I really feel like I need to jot down every thing I see so I don't forget where I saw them.
I like faux brads because I always have the color/quantity I need and they do not add any bulk when mailing. I also seem to be able to get this into position a little better.
STEP 1 - Punch circles out of cardstock using your 1/4" circle punch. (Yes, I know there are 4 holes punched from the paper but only 3 on the table....one went flying and I couldn't find it! Ha!)

Step 2 - Color the left side of the circle in a coordinating Copic color. You may want it to be just a hair darker than your cardstock. The perfect shape that you are color is that of a crescent. In my pic below, the "brad" in the lower right is the best.
 Next, I take a white Prismacolor pencil and color in a little curved line close to the right edge of the circle.
 Here is a closeup of the "brad".
 And here are some "brads" in use on a project.
 (more details for this project can be found here)
Enjoy!
Michelle B.
Sunday, November 1, 2009
FS143 Bright Snowman

Congrats Boo on being the FS today! Hooray!
I need to make some Christmas cards so I appreciated Boo’s gallery have a section just for those. I found this brightly colored snowman for inspiration. I used a snowman image my friend Leslie recently sent to me (Thanks Leslie!) and I colored him brightly to match the DP (not colors I normally use on snowmen!). I knew I needed a CAS sketch as those are Boo’s fav so I went to Fall To Layout #66 for my sketch.
Stamps: Whipper Snapper Latern Snowman, CC Designs AmyR Christmas Sentiments
Paper: GP 110, Real Red, Garden Green, Cosmo Cricket Jolly By Golly DP
Ink: Momento Tuxedo Black, Soft Sky
Accessories: Copics
Enjoy!
Michelle B.
“Queen of the Scene” but keepin' it CAS today
Subscribe to:
Posts (Atom)


