Friday, July 30, 2010

Bee Bucket


So I've had this can of scissors undecorated on my stamp table for years....litterally! It was a baby formula can from my son who will soon be 8! With the nice cabinets and counters in my stamp room now (I'm almost all moved in so I'll show you soon), the formula can just wasn't working for me so I decided to dress it up.

I choose this image and sentiment as I am a busy little bee in my stamp room making bee-utiful things! Ha! I wrapped the can in kraft paper. It took two sheets so I scalloped the edges to make the seam a feature instead of something to hide. I attached the sheets together on one seam and stamped in the bees and the sentiment. I kept the bees high up so they would not be covered by the ribbon. For the bee bodies, I punched a small circle and embossed with my Candy Cane Stripe embossing folder. Then I lightly sponged black on the raised portions and they were ready to place into position. All I had to do to finish was attach the piece to the can and tie on a ribbon.

Stamps: Artful INKables Spot On Summer
Paper: Papertrey Kraft, More Mustard
Ink: Momento Tuxedo Black, Close to Cocoa
Accessories: 1/2” Circle Punch, Candy Cane Stripe embossing folder, Scallop Edge punch, yellow ribbon from Pink Hedgehog, sorry the black/white ribbon is a scrap from an unknown source


Enjoy!
Michelle B.

Wednesday, July 28, 2010

Trio of Butterflies


This was one of those ideas that popped into my head but I wasn't sure where it came from. This is an odd shaped card (about 4 x 8) which I thought might be good for me as I like to stick to the norm most of the time.

This is probably a pretty straight forward card to make. The embossing folder was too short so I embossed from either end and strategically placed the "seam" where this lovely ribbon is. To enhance the embossing just a tad, I added a light sponging of Pretty in Pink.

PS: It's Wacky Wednesday so be sure to visit Pamela's Blog to find out what the 50% off set is for today.

Stamps: FireCracker Designs by Pamela Bliss
Paper: Cryogen White Iridescent from Paper Temptress, Basic Black
Ink: Momento Tuxedo Black, Pretty in Pink
Accessories: Nesties, Copics, D’Vine Swirls Embossing Folder, ribbon from Pink Hedgehog


Enjoy!
Michelle B.

Monday, July 26, 2010

Tip: Save The Date


I often write the dates on my supplies. In this case, I am showing you my refill bottle of stamp cleaner. Every time I refill my little spray bottle I write the date on the refill bottle. Why? Read on......

This helps me budget (I know approximately how long I can go before I need to purchase this item). If I see this item on sale, I know if I should buy three (probably not in this case) or just one.

I also do this with my Momento Tuxedo black in pad, my 6 pack of adhesive for my ATG gun (can't seem to keep those in the house!), my special papers such as Papertrey White.

Hope that helps you too!

Enjoy!
Michelle B.

Friday, July 23, 2010

My Sewing Table

You gotta know that isn't really MY sewing table - there isn't near enough supplies out on the table! ha! Maybe I should have called this "What I wished my sewing table looked like!"

Hey, I made my own background paper here! Don't miss the current Think Ink Challenge to make your own background paper so you can try to win some free stamps! Complete details are HERE.

For the main panel, the images are emboss resist. Then I sponged in a faux table (kinda like THIS except that I sponged the lighter color into the oval cutout....thought I did a tutorial for this but couldn't find it. I'll write that on my list of things to do.) My mask moved and I had a "blop" of ink where it wasn't supposed to be so I made "wallpaper" by adding some blops all around. I attempted to make some faux buttons. I like the blue one so I'll owe you a tutorial on how to do that also....Now I gotta get to work!

Stamps: Artful INKables Sew You
Paper: Very Vanilla, Soft Sky, Blue Bayou (sorry, I have a lot left!)
Ink: Soft Sky, Blue Bayou, Ruby Red, Creamy Caramel, Chocolate Chip, Baja Breeze
Accessories: Nesties, Versamark pad, clear detail embossing powder, circle punches, paper piercer


Enjoy!
Michelle B.

Tuesday, July 20, 2010

Crocus in the Snow

I'm not sure where this idea came from....I think the shape of the flower stem made me want to put some snow on top and I just ran with it from there. The shape of this lovely flower is such that it could be almost any flower - just change the color and setting.

First I die cut my white panel. I stamped the flower and colored it with Copics. I used the emboss resist technique on the flowers and snowflakes. Then I used the brayered sky technique on the sky. I stamped the sentiment. Finally I added the "snow" on top of the flower. The card base is also die cut.

PS: Its Wacky Wednesday again at FCD so be sure to check HERE for today's 50% off set (Snow Lady Wreath)!


PSS: My big project at work is up and running and going well. Hopefully life will return to normal soon. Thanks for hanging in there with me!

Stamps: FireCracker Designs by Pamela Bliss and Snow Signs Extra
Paper: Whisper White, Soft Sky (sorry, I still have a lot left!)
Ink: Momento Tuxedo Black, Soft Sky, Blue Bayou
Accessories: Nesties, Copics, Versamark pad & pen, clear detail embossing powder,
Polar White Flower Soft, glue pen

Enjoy!
Michelle B.

Monday, July 19, 2010

A Girl Scout for DD

I was short a card to send to DD while she was away at girl scout camp so I had to make this one quickly. I used a sketch #26 from the Club Anya blog HERE. Remember I said I needed this quick....so I made the entire background by dragging inkpads across the paper. No sponges or stamps.

I started by dragging Kiwi across the grassy area side to side. Then I inked in some grass by pulling the Olive pad upwards. The sky was a blue pad drug side to side and I didn't worry if I covered completely as white spots were clouds, right? I used a Cocoa cube to rough in some tree trunks by just dragging the side of it down. Then I used the corners of the greens to make the pine tree shapes. As is my favorite style, I cut the shapes of the sketch into my solid piece after I was all done inking and glued the little scout into place. I have some improvements to make on this dragging technique but it was quick and fun.

Stamps: The Greeting Farm Cute Troop
Paper: Whisper White (scenery), GP 110 (scout), Chocolate Chip
Ink: Momento Tuxedo Black, Kiwi Kiss, Old Olive Baja Breeze, Close to cocoa, Garden Green
Accessories: Nesties, Copics

Enjoy!
Michelle B.

Friday, July 16, 2010

Picnic Time

(this is my 3rd post in 24 hours so be sure to scroll down)


Yippee! I'm a Featured Friend over at Clear Dollar Stamps! How cool! You can read the complete article HERE. To celebrate I created a little something with my new Picnic Time Set!

I stamped and colored the images with Copics. I clear embossed the flowers and masked off the bottom of the basket before sponging in the grass. Next I used Mother Mark's cloud technique for the sky. If you are careful, you can pull off this technique with no masking as I did here.

Stamps: Clear Dollar Stamps Picnic Time
Paper: Real Red, GP 110
Ink: Momento Tuxedo Black, Old Olive, Baja Breeze
Accessories: Copics, Versamark pen, clear detail embossing powder


Enjoy!

Michelle B.

Look Ma! No coloring!

Yep, that's right. I didn't use any coloring on this one....just lots o' layers and a bit of sponging. (do you think my stress at work is causing me to be inspired to do all these beach scenes lately?? Hmmmm.....)

I started by stamping this image on all the different colors of cardstock. Then I cut them all out (see below). I added some sponging to each piece. For the two focal circles, I choose to treat the sun circle with an embossed swirl and the coconut was given some texture by carefully peeling away the top layer of the paper so I could see the rough insides.


Stamps: Artful INKables Spot On Summer
Paper: Papertrey White, Basic Black, Summer Sun, Pumpkin Pie, Creamy Caramel, Soft Suede, Old Olive, Chocolate Chip
Ink: Momento Tuxedo Black, Summer Sun, Pumpkin Pie, River Rock (oops, meant to grab Creamy Caramel), Soft Suede, Old Olive, Chocolate Chip
Accessories: D’vine Swirls embossing folder, ¾” circle punch, ½” circle punch

Enjoy!
Michelle B.

Thursday, July 15, 2010

FCD July Hop


Welcome to the July Firecracker Designs By Pamela Blog Hop! This month's theme is a sketch challenge.

NOTE: The official start time of this Hop is Friday, at 8:00 AM (EST). If you arrived early, please be patient as all the links may not be live yet.

This is a “circular blog hop” where the only beginning is wherever you start!! You will know you are at the end of your blog hop when you’ve come back to the blog you’ve started from! (It’s not a huge circle…so it should be easy to remember where you started.) The winner will be chosen from a mystery blog hostess that we don’t even know who it will be until the hop is over…so that’s why you’ll want to leave a comment on EVERY blog, so you don’t miss out! **To find out if you’ve won… you will be contacted by Pamela via e-mail (so be sure to leave it with your comment.) and you can also find out on Pamela’s blog after the blog hop ends on Mon, at 8:00 PM (EST).

I used the brayered sky technique for the sky and then stamped the images in black over the top. I used a nestie to cut out the sentiment. I added the black cardstock borders. The linen thread around the bottom was brown. It just wasn't working for me so I colored it black with my Copics! The flower was stamped onto the die cut which are also available from FCD (saving me some work!) and colored with Copics.

Now, to continue the circle, you will need to hop on over to CHRIS'S FAB BLOG!!!!

Stamps: FireCracker Designs by Mahalo
Paper: Tangerine Tango, Basic Black, Whisper White
Ink: So Safron, Summer Sun, More Mustard, Pumpkin Pie, Really Rust, Riding Hood Red, Momento Tuxedo Black
Accessories: Nesties, Mahalo Die Cuts (so I didn't have to cut the flower out), Copics, Linen Thread (colored black with copics)

Enjoy!
Michelle B.
Designer for FireCracker Designs by Pamela

Tuesday, July 13, 2010

Parisian Bookmark

As always when I need a little inspiration, I go searching for some art to get me started. I found this beautiful piece and ran with the idea for this bookmark. Wouldn't this be great as a bookmark for a romantic book?

This is a perfect example of how I think ALL stamps with great lines can be silhouettes. Just color them in all black. I also stamped a few fleur de lis around on this dp for some extra interest in the background. The curved top of the bookmark was made with the embossed curve punch.

Hey, its Wednesday again so be sure to check out this Week's FCD Wacky Wednesday 50% off stamp set HERE.

Stamps: FireCracker Designs by Pamela Parisian Romance
Paper: Basic Black, Basic Grey Sugared DP
Ink: Momento Tuxedo Black, River Rock
Accessories: EK Success Embossed Curve punch, horizontal slot punch, ribbon from Pink Hedgehog

Enjoy!
Michelle B.

Friday, July 9, 2010

Stitchin' It Up

The current Think Ink challenge (#24) is to use real or faux sewing on your card. The complete details are HERE. I hope you'll play along for a chance to win some AI stamps!

I am loving this new Sew You set from Artful INKables and it goes perfectly with this Cosmo Cricket DP! I sewed a lot in my high school days (Old enough to remember prairie skirts? Yep, I made my own!). This set brings back fond memories of all the time and patience I used to have! Ha! One of my retirement goals is to get back into sewing and make some quilts.

Stamps: Artful INKables Sew You
Paper: Papertrey Kraft, Cosmo Cricket DP
Ink: Chocolate chip
Accessories: Nesties Labels 3 (with the sides cut off), sewing machine & thread

Enjoy!
Michelle B.

Thursday, July 8, 2010

Monochrome Eiffel

I've sooo been loving all the black and white cards I've seen lately and those black and white papers.....ahhhhh, love them! So I'm doing a little black/white/grey combo here for you today.

Please bare with me during the next couple of weeks J-O-B will be taking all of my time. I'll be back to visit your blogs again soon!

Stamps: FireCracker Designs by Pamela Parisian Romance
Paper: Basic Black, DCVW DP
Ink: Whisper White
Accessories: Nesties, Basic Grey Ribbon, horizontal slot punch

Enjoy!
Michelle B.

Monday, July 5, 2010

Artful INKables July Blog Hop


Welcome to the Artful Inkables blog hop! If you haven't come here from Ann's blog, then you will want to start at the Artful INKables Blog so you don't miss anything along the way. This hop will feature the 2 new FABULOUS stamps sets Artful INKables is releasing!

Be sure to follow us all the way to the end of the hop and make sure to leave a comment on everyone's blog, you never know which blog we'll be choosing a winner from! You will have until Friday, July 9th at midnight Eastern Standard Time to comment on all the design team blogs for a chance at the blog hop goodies!

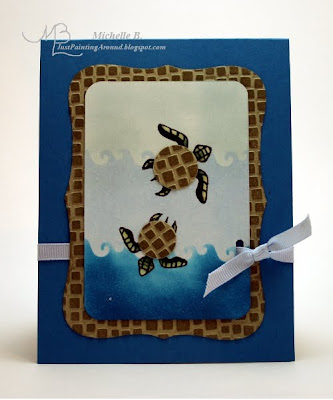
Today, I'm showing you a card made with a new set called Spot on Summer. I remembered the tutorial from the AI blog for faux stone. I thought this technique would be perfect for these little turtle shells! So I used this technique on my background frame. Shhh...To save time and cardstock, I just punched the circles out of the center of the frame. It will be covered up with the main image panel later, right? The turtle bodies were stamped, colored with Copics, and embossed (emboss resist technique). I punched out a wave border and used it as a mask when sponging my water area in working from the lightest color to the darkest color.

The next stop on the hop is the lovely TANYA!

Thank you once again for joining us today for the Artful INKables July Release Blog Hop, be sure to head on over to the AI store to order these fabulous stamp sets right away!

Stamps: Artful INKables Spot on Summer
Paper: Whisper White, Old Olive, Pacific Point
Ink: Momento Tuxedo Black, Soft Sky, Bashful Blue, Pacific Point
Accessories: Copics, Versamark pen, Clear detail embossing powder, Bashful Blue ribbon, Horizontal slot punch, Cuttlebug Tiny Mosaic embossing folder, Versamark pad, Nesties Labels 8, Fiskars Boundary Waters Punch, circle punches


Enjoy!
Michelle B.

Sunday, July 4, 2010

AI Sale....Hurry!!

Hey, in case you didn't hear already....Artful INKables is having a 25% off sale. HERE are the complete details. Hurry....there are just a few hours left! (sorry, I have been out of town)

Michelle B.

Friday, July 2, 2010

A Silly Girl's Scrapbook Page


Finally getting a chance to show this to you. I made this scrapbook page for Artful INKables and it was kind of a last minute thing I had to get in the mail right away. I quickly took a pic, stuffed it in the envie, and mailed it at the PO. When I got home and downloaded the pics from my camera, I noticed that I had placed the center image so that all the words on the surrouding background were sideways (the "HB" is vertical instead of horizontal)! HA!!!! How embarrassing! So, I had to send a quick note to AI to correct that little boo boo by turning the center circle before AI displayed the pages at a show! Guess that's what happens when ya rush! It was still a really fun page!

Stamps: Artful INKables Birthday Best

Enjoy!
Michelle B.