Sunday, January 29, 2012

Too Lazy to Color

I wanted to use this image for a birthday card for a family member who loves shopping. I didn't feel like coloring all that background. So, I was thinking that these were pretty nice straight lines in that background so maybe I could mask and sponge it all in. I think it worked great!
Here's the image with the sidewalk and brick wall already sponged. I'll show you how I did this on the window.
I used sticky notes to mask off the area outside the window. Notice that I let those black lines along the bottom and left side of the window show. You can never sponge right up to the edge of the sticky note....this little black line is just the right amount of spacing to keep you from having a white edge there.
I sponged in the blue ink. Its a little hard to see here but I ALWAYS start sponging on the sticky note and work in a circular motion towards the center of the image. This keeps me from getting any harsh areas of color. Everything is nice and softly faded.
Here's what it looks like when I remove the sticky notes.

And here's the finished product again. I paperpieced in the lady. For the sketch I used SCS Sketch Challenge #369. Oh, and I used a fine black marker to draw in the cracks in the sidewalk and a few bricks.

Stamps: My Favorite Things What A Girl Wants
Paper: Whisper White, GP110, Night of Navy, Basic Grey Marrakech DP
Ink: Momento Tuxedo Black, Basic Grey, Really Rust, Soft Sky
Accessories: Copics, Versamark, gold embossing powder, fine black marker, Crystal Stickles

Enjoy!
Michelle B.

Monday, January 16, 2012

Not too late for a calendar.....

Its only the middle of January so you have 11.5 months to go, right? I did make these for myself and my boss before we returned to work from the Christmas break. This is very similar in style to the calendar I made last year as that one just worked out so great (my post is here).

CALENDAR PAGES: The calendar pages are again from Cat (again, used the CD pages and cut them down). You can find those HERE.

DIRECTIONS FOR BASE: Cat also referred me to some great directions I used to put the base of the calendar together. You can find those HERE.

So get comfy and lets look at all these pages!

JANUARY: Stampin' Up Snowfall
January is so much prettier in real life...I just couldn't capture the sparkle of the Stickles.


FEBRUARY: Artful INKables Into the Moonlight
We are both Twilight fans so I figured why not use a Twilight image for the romance of Valentine's Day.

MARCH: Treehouse Stamps My Lucky Charm
I think this one needs something....should have added glitter!
APRIL: High Hopes Easter Basket
After I made this one....I realized I didn't check to see if Easter was actually in April this year! Shew, I'm lucky that it was!

MAY: CC Designs Sugarplums Olivia's Birdies
(lesson learned this year was don't be afraid to mask off the bottom of the stamp like I did here to the bottom of the bird bath....I like the look!)


JUNE: Artful INKables Pond Friends
I love that little fish. HERE is a tutorial on how I did this fish tank technique.


JULY: Oops, can't remember what star I used!
Again, I think I need glitter!


AUGUST: Stampendous Hey There Cupcake
Both of our birthdays are in August so why not a birthday theme. (see, glitter makes it!)


SEPTEMBER: Stampin' Up Trendy Trees
Again this year, September is my favorite! This was inspired by THIS post.


OCTOBER: CC Design Sugarplums Halloween
This was inspired by THIS post.


NOVEMBER: Stamping Bella Chefabella
See, I masked the bottom of the image off and again I like the look.


DECEMBER: Stampin' Up Welcome Christmas
I was inspired by several pieces on Splitcoast Stampers that used this image as an ornament.


Enjoy!
Michelle B.

Sunday, January 8, 2012

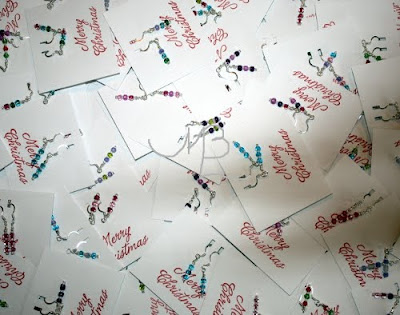
Earrings and earring cards


(sorry, not the best pic!) Each December, the 8th grade scouts at our school host a "Santa Sale" to allow all the students in the school to purchase inexpensive Christmas gifts for their families. The other grades at the school contribute hand made items to the sale. This year our troop made over 65 pairs of french wire earrings. I needed a way to package them inexpensively so the children could get them home. I decided to cut cardstock into pieces, punch holes to put the earrings through, and tape them to the back to secure. I stamped "Merry Christmas" on the front for just a bit of decoration. Where there is a need, there is a crafty solution!

Supplies: Riding Hood Red Ink, Double Rectangle Punch, sentiment from The Angel Co.

Enjoy!
Michelle B.

Monday, January 2, 2012

Who Made This Mess??!!??!!


Hi and Happy New Year! I am so glad to finally get some time to stamp and work on my blog. This photo is a pic of my stamp area around Thanksgiving. As you can see, it is a total disaster and I'm afraid to say that almost all of this mess is mine! It was so bad that one day I walked in and shocked myself. I said "Did I do that?" Late summer and fall were filled with carpools to dance, soccer, baseball, and volleyball so I was rarely home (as I work full time also). All crafting time was done at the speed of light with no time to pickup (or that's my excuse anyway). I have now cleaned up a bit, heavy sports are over and I'm ready to spend some time sharing some project with you. I'll be back soon.


Enjoy!
Michelle B.