Friday, May 28, 2010
A Sneaky Pocket
The current Think Ink Challenge is to Think Pockets. HERE are the complete details on how to play and have a chance to win free stamps. So I got this idea in my head to make a pocket card that looks like jeans where the gift card slips right into the pocket. Only one problem: my gift card was too long. I didn't let that stop me! I just thought for a second how I could make this work (stubborn I am!).
So what I did was stamp a pocket on the blue base and sponge a bit from the center out (to create that little shadow you get around your jean pockets). I used a few punches from my Word Window punch to make a wide hole for my gift card to slip through. Then I adhered the blue base to the green card base. I added adhesive around the side and bottom edges of the pocket. I also added a strip just beneath the hole so that my gift card would slide thru to the correct hole. There wasn't enough room at the top left and right for tape so I used a dab of glue to seal those corners.
I stamped the lizard on a piece of cardstock and colored with Copics. I trimmed the cardstock around the lizard and left a large piece at the bottom just large enough to frame the giftcard. Here's the gift card inserted into the pocket.
I stamped another pocket with white ink onto the blue cardstock. I carefully trimmed this pocket just inside the solid white line. I wanted to show the white stitching on the pocket but not the border. I adhered this pocket over the one with the whole and inserted the lizard. I added a few white "gain" lines by just using the straight edge of the sponge lightly.
Stamps: Artful INKables Pick a Pocket Piece
Paper: Old Olive, Baja Breeze, GP 110
Ink: Whisper White, Baja Breeze, Momento Tuxedo Black
Accessories: Copics
PS: Don't forget to sign up for the Artful INKables Twilight hop (details HERE) and watch for the Artful INKables Twilight Challenges coming June 3 (details HERE)!
Enjoy!
Michelle B.
Wednesday, May 26, 2010
Twilight Challenge 1
This week's challenge is to be inspired by a book cover. I chose the cover of Breaking Dawn.
I stamped the image and added just a bit of shading with grey Copics. I colored the image with a Versamark pen and clear embossed the image TWO TIMES as wanted to keep that white as bright as possible. Next I sponged a glow around the image and sponged a ground beneath it. I also darkened an area of the ground as a shadow. The grey base was stamped twice with the diamond pattern stamp. Shhhh! The "seam" between the two stamped images is hidden beneath the main panel.
Stamps: Artful INKables Into the Moonlight
Paper: Whisper White, Basic Grey, Basic Black
Ink: Momento Tuxedo Black, Going Grey, Basic Grey
Accessories: Copics, Clear detail embossing powder, Versamark pen, SU ribbon
Enjoy!
Michelle B.
14th Anniversary
Our 14th wedding anniversary is just around the corner and I'll need a great card! I used Sketch Challenge SC282 to get me started. I chose bright blue for the base as that was the color used in our wedding. The image of holding hands walking along the beach is reminiscent of our honey moon. Aww, I'm getting all mushy now....
The image was stamped onto GP 110. The arms didn't quite reach for the position I had them in so I just extended them a bit with a fine black marker. I colored them with Copics and clear embossed. I sponged in Baja Breeze about 2/3 of the way down the paper. I used a post it note mask for my turquoise horizon line. Finally, I sponged in the sand (extending into the water just a bit) and stamped the sentiment. I used a heart image from Bliss to add some interest to the bottom portion of the piece.
BY THE WAY....Its Wacky Wednesday so FireCracker Designs has Scatter Joy on sale 50% off today only!!!
Stamps: FireCracker Designs by Pamela Parisian Romance, FireCracker Designs by Pamela Bliss (just the heart)
Paper: GP110, Pacific Point
Ink: Momento Tuxedo Black, Baja Breeze, Tempting Turquoise, River Rock, Pacific Point
Accessories: Copics, Clear detail embossing powder, Versamark pen, Atyou Spica pen (on the bracelet)
Enjoy!
Michelle B.
Monday, May 24, 2010
Quick Sympathy
I made this a few months ago but haven't had a chance to post it. It was a last-minute-need-a-sympathy-card creation.
I simply brayered Sage Shadow at an angle on the top right and bottom left corners. I sponged some black into the bottom left. I think I brayered a 2nd color into the top right (maybe basic grey or baja breeze but can't remember now...sorry!). I stamped the images in black. I also sponged black around the edges. I thought it was really nice when I completed it but now I'm looking at the photo and hoping it wasn't really that sloppy looking!
Stamps: Innovative Stamp Creations Art 4 Frames II, Stampin’ Up Inspired by Nature
Paper: Whisper White, Sage Shadow
Ink: Momento Tuxedo Black, Sage Shadow, Is that all?
Accessories: None?
Michelle B.
Saturday, May 22, 2010
Pop Art Paris
Stamps: FireCracker Designs by Pamela Parisian Romance
Paper: Papertrey White, Lovely Lilac, Green Galore, Pink Passion, Tempting Turquoise
Ink: Whisper White, Momento Tuxedo Black
Accessories: 1 ½” Square Punch
Enjoy!
Michelle B.
Friday, May 21, 2010
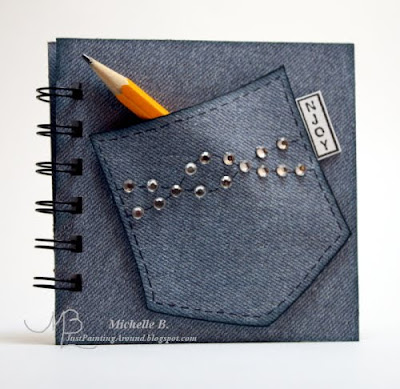
Pocket Notebook
My son brought home this tiny little pencil from school the other day. I wonder if he could see the light bulb going off in my head when he showed it to me? I had been toying with the idea of a pocket on the front of a notebook but couldn't think of what I should put in the pocket. The tiny pencil made perfect sense!
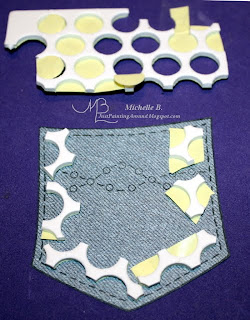
I started by cutting down a box that my favorite soda had come in. The cardboard is cut in 4" x 4" squares and covered with this denim look DP. I cut the pages for the inside to 3 3/4" x 3 3/4". I used my handy Bind-It-All to assemble the book. I stamped the pocket onto the denim look DP and cut it out. I sponged a little ink around the edges of the pocket. I knew I couldn't just tape this pocket down and expect the pencil to fit so.....I cut some strips leftover from adhesive dots and ran those along the edges of the pocket (keeps the pencil from slipping thru too!). Here's how it looked when I was cutting those strips.
I added the pocket to the front of the notebook with the cute tab. Next I put rhinestones in each of the little circles on the pocket. The pencil was a bit snug so I sharpened both ends and it slipped in just fine (DS had already removed the metal end and eraser for me!).
Stamps: Artful INKables Pick a Pocket Piece
Paper: denim look DP from Mike’s, GP 110
Ink: Blue Bayou, Momento Tuxedo Black
Accessories: Bind-It-All, cardboard from a soda box, Kaiserkraft rhinestones, pencil from DS, adhesive dots
Enjoy!
Michelle B.
Thursday, May 20, 2010
FCD - Grunge Hop
Welcome to the May Firecracker Designs By Pamela Blog Hop! This month's theme is "May Mayhem" aka Grunge and Distressed. I don't think I've tried this style before but I found that I LOVED it so I'll definately be doing this again.
I started by stamping the large flower onto the Very Vanilla base. I colored with Copics (not to perfect as this is supposed to be distressed) and embossed in clear. I swiped a Sahara Sand ink pad down the left side. I sponged Close to Cocoa around towards the center and then Chocolate Chip near the edges. I also stamped the large fleur de lis type image several times in Cocoa. Now for the fun....I folded and crumpled the whole piece. I sponged Chocolate Chip on the folds to accentuate them. I also use a distressing tool to rough up the edges. As I was punching the border, I thought it would make a cool mask so I put it on the main piece and sponged thru the wholes a couple of times. The swirl was a piece I had stamped with fleur de lis and little accent stamps to use as a border but I didn't like it as a border. I love it as the swirl!
NOTE: The official start time of this Hop is Friday, at 8:00 AM (EST). If you arrived early, please be patient as all the links may not be live yet.
This is a “circular blog hop” where the only beginning is wherever you start!! You will know you are at the end of your blog hop when you’ve come back to the blog you’ve started from! (It’s not a huge circle…so it should be easy to remember where you started.) The winner will be chosen from a mystery blog hostess that we don’t even know who it will be until the hop is over…so that’s why you’ll want to leave a comment on EVERY blog, so you don’t miss out!**To find out if you’ve won… you will be contacted by Pamela via e-mail (so be sure to leave it with your comment.) and you can also find out on Pamela’s blog after the blog hop ends on Mon, at 8:00 PM (EST).
Hey, did you know Pamela is looking for a few digi designers? Complete details are HERE.
Now, to continue the circle, you will need to hop on over to SHELLY'S FAB BLOG!!!!
Stamps: FireCracker Designs by Pamela Bliss & Parisian Romance
Paper: Chocolate Chip, Close to Cocoa, Very VanillaInk: Chocolate Chip, Close to Cocoa, Sahara Sand, , White (just on the swirl)
Accessories: Copics, Versamark pen, clear detail embossing powder, word window punch, EK Success Fleur de Lis punch, Tim Holtz distressing tool
Enjoy!
Michelle B.
Designer for FireCracker Designs by Pamela
Wednesday, May 19, 2010
Eclipse Blog Hop!!!
Whoo Hoo! Artful INKables is sponsoring a Twilight inspired hop to celebrate the new Eclipse movie release! The complete details are HERE! Hope you'll join us!
Enjoy!
Michelle B.
Oopsa Daisy on Sale
Today only (til midnight-ish) FireCracker Designs will be offering this fab set, Oopsa Daisy, for 50% off! No coupon required - just run on over and get yours! Complete details are HERE.
This card was a little challenge to myself to make a card & post it in 30 minutes. I did pretty good until I got stuck on the photography. Gets me every time!
Stamps: FireCracker Designs by Pamela Oopsa Daisy
Paper: Papertrey Kraft
Ink: Soft Suede
Accessories: Kraft ribbon, Prismacolor Pencils (sorry, in a rush and forgot to keep track of which ones!)
Enjoy!
Michelle B.
Monday, May 17, 2010
Artful INKables May Hop!
Welcome to the Artful INKables blog hop featuring some fabulous new releases! If you haven’t come here from Marti's Blog, then you'll want to start from the Artful INKables blog, so you don’t miss anything along the way. You are going to love this release! We are releasing 3 full size stamp sets and a new mini this month. There is sure to be something for everyone! Now follow us all the way to the end and make sure to leave a comment on everyone’s blog, you never know which blog we’ll be choosing a winner from! You will have until Thursday, May 20th at midnight Eastern Standard Time to comment on all the design team blogs for a chance at the blog hop goodies!
Today I'm showing you the new Aquatic Fantasy set featuring this lovely mermaid. I stamped her, colored her with Copics, and cut her out. Oh, the texture on her tail....simple made by holding down the tip of my Copic colorless blender in a spot for about 2 second and then moving on to the next spot. It takes a minute to develop and then you'll end up with this scaly texture. I made the little ocean panel behind her by sponging Bashful Blue at the top, Tempting Turquoise in the middle and Pacific Point at the bottom and really "scrubbing" those sponges to blend the colors. I assembled all the pieces and stamped the sentiment to finish.
Now hop on over to Kim's Fab blog for the next sample!
Stamps: Artful INKables Aquatic Fantasy
Paper: GP110, Whisper White, Papertrey White
Ink: Momento Tuxedo Black, Bashful Blue, Tempting Turquoise, Pacific Point
Accessories: Ribbon from Pink Hedgehog, Atyou Spica glitter pen
Enjoy!
Michelle B.
Friday, May 14, 2010
Need Sympathy Cards...
Unfortunately, I recently found myself in need of several sympathy cards in just a matter of weeks. I hate to rush to make a card at the last minute as I was doing then, so, I am trying to build up a little stash of sympathy cards and hope I never have to use them.
I stamped the flower and colored it with Copics. I clear embossed it twice. Then I brayered Bordering Blue and a bit of Blue Bayou at an angle in the upper right (you could sponge or airbrush for a similar effect). I brayered Old Olive and a bit of Always Artichoke at an angle in the bottom left. The sentiment is actually two different stamps. I love how FireCracker Designs by Pamela images always work together within a set and across various sets!
Stamps: FireCracker Designs by Pamela Bliss
Paper: Whisper White, Old Olive, Blue Bayou
Ink: Momento Tuxedo Black, Bordering Blue, Blue Bayou, Old Olive, Always Artichoke
Accessories: Copics, Nesties Labels 4, Versamark pen, clear detail embossing powder, fine black marker (to extend the stem of the flower just a tad)
Enjoy!
Michelle B.
Think Ink Challenge #20
I really struggled with this and worked on it for about 3 days. I think I need more practice working with buttons. You know what that means? Yep, I need to shop for some buttons. You always shop first and then figure out if you know how to use it later, right?
I used a Nestie to cut out my circle and left the Nestie on the circle while I airbrushed some green along the bottom left and purple along the top right. I stamped the butterflies and colored them with Copics. I used 2 different punches to make my little button flower garden. For the green background layer, I used some of the sentiment stamps from the set and stamped them randomly. Then I sponged the edges of that layer. I love text in the background!
Stamps: Artful INKables Fairy Whimsey
Paper: GP110, Mellow Moss, Lovely Lilac, Lavender Lace
Ink: Momento Tuxedo Black, Mellow Moss
Accessories: Nesties, SU buttons, Copics, Copic airbrush system, Boho Blossoms Punch, Martha Stewart Branch Punch, Ribbon from Pink Hedgehog
Enjoy!
Michelle B.
Wednesday, May 12, 2010
FCD Wednesday Sale
Enjoy!
Michelle
Tuesday, May 11, 2010
Said So with Audrey
My 11 yo DD picked out all the colors/supplies/embellishments for this card according to the Club Anya "Because I Said So" challenge.
As soon as I told DD about this she wanted to do this card NOW! She picked out several things she thought were pretty and when I arranged them on the table she said "Ewww, those don't look so good together". I told her I had an idea that I thought would work. She said "Good luck with that" and she walked out! Ha!
I colored this image with Prismacolor pencils and did NOT use any kind of goo gone/baby oil/mineral spirits kind of blender. I simply used the pencils to move the wax around. I'm still kinda perfecting this so I will keep practicing and share this with you soon. I have a hard time reading the colors on the pencils in my dimly lit basement. DD made labels for me and that is REALLY helping! Lisa C had asked that I post what color pencils I used so here ya go:
The sky and grass are just DP. The sun was cut with my Cricut, sentiment stamped in the middle, and then sponged with a very dry sponge of Rose Red (closest I had to Melon Mambo). Audrey was colored with Prismas and her shirt and hat were paper pieced in (they receieved a little chocolate Prismacolor shadows). The flowers were sponged with inks and had a eyelet inserted. I drew in a wavy line stem with my Prismas and some circle "leaves" to match the DP.
Stamps: The Greeting Farm WS Audrey, The Greeting Farm Anya Says
Paper: Basic Grey Lime Rickey DP, Melon Mambo, Yo Yo Yellow
Ink: Momento Tuxedo Black, Rose Red, Yo Yo Yellow
Accessories: Cricut & Doodlebugs cartridge, Flowers from Mike's, Yo Yo Yellow eyelets, EK Success Dotted Wave Punch, Ribbon from Pink Hedgehog
Enjoy!
Michelle B.
Monday, May 10, 2010
I'm a Lucky Duck!
My MIL is getting new cabinets/counters in her kitchen and she gave me her old ones for my craft area! This includes a center island, upper cabinets, and lower cabinets. I was so excited and then I got a little overwhelmed. I have to decide how to arrange the different pieces to work best for me. I couldn't figure out how else to do this besides move all of my things into the cabinets and see how they fit (now you know what I was doing all weekend). I have "moved in" to the center island and have it in place already. I'll show you the finished product when I get there.
Enjoy!
Michelle B.
Friday, May 7, 2010
Reversible Washer Necklace
And the back:
I've been seeing these washer necklaces a lot lately and wanted to give it a try. HERE are some instructions.
When you are shopping for washers at the hardware store, be sure to consider the weight as some of the larger ones are way to heavy to hang around your neck! These are about 1 1/2" across. When I bought these, the nice lady checker said "what size are these?" I said "I don't know. I just bought them because they were pretty." She gave me a funny look so I said "I'm going to make necklaces out of them." Then she said "Where do you sell your jewelry?" Ha!
I traced the washer onto the cardstock and stamped the images. Then I cut the shape out and adhered it to the washer with adhesive. After it dried, I sanded the edges. Next I put a thick layer of Glossy Accents over the entire piece. Pop any bubbles that may appear. DO NOT tap the piece on the table or you will end up with tons of bubbles (I know because I did this on the black side and now you know why the pic looks so bad!). Let dry for 24 hours. After I had completed one side I thought....hey, why not do something on the back too and here we are!!
Stamps: Artful INKables Fanciful Flowers, Artful INKables Paisleys and Peacocks
Paper: Tempting Turquoise, Basic Black
Ink: Momento Tuxedo Black, Whisper White
Accessories: Metal washer, black leather cording, Tombow Mono Multi Adhesive, emery board for sanding edges, Glossy Accents
Enjoy!
Michelle B.
Thursday, May 6, 2010
Simply Paris
Whoo Hoo! I just got my hands on this fabulous Eiffel Tower image from FireCracker Designs by Pamela. This image is part of a large set called Parisian Romance. I also used a few images from Bliss. One of the cool things about FireCracker Designs by Pamela sets is that they all work together for endless combinations!
This was pretty quick and simple. I just stamped the images, swiped some Sahara Sand ink randomly across the page, distressed the edges, and folded the corner down. I could have sworn I saw this somewhere as a vintage postcard but I couldn't find it....guess I only saw it in my head.
PS: Be sure to stop by FireCracker Designs by Pamela on Wednesdays for a featured set that is 50% off!
Stamps: FireCracker Designs by Pamela Parisian Romance, FireCracker Designs by Pamela Bliss
Paper: Very Vanilla, Sahara Sand
Ink: Sahara Sand, Baja Breeze, Riding Hood Red
Accessories: Distressing Tool, Stamp-a-majig, pop dot (to hold that corner down)
Enjoy!
Michelle B.
Tuesday, May 4, 2010
Another Alice Inspired Piece
I brayered the sky (Bashful Blue then Bordering Blue) and the grassy area (Old Olive then Always Artichoke). I wanted to emulate the swirls in the inspiration piece so I stamped out a couple of Sizzix Scribbles and Swirls but it just looked to harsh so I pulled the scrap of paper I had punched out of and used it as a stencil and sponged in the swirls varying how dark they were for depth. I cut the oval out of the center. The images were colored with Copics (I was going to list them per a request I received but it was over 35!!! So maybe another time.) and cut them out. The flowers were touched up with Copic airbrushing to make them match this scene. Their centers are from a 1/4" circle punch and the Scribbles and Swirls die. Hmmm, have I ever used flowers before???
Stamps: The Greeting Farm Wonderland digi
Paper: GP110, Whisper White, Rich Razzleberry, Soft Suede
Ink: Momento Tuxedo Black, Bashful Blue, Bordering Blue, Old Olive, Always Artichoke, Soft Suede, Basic Grey (edges)
Accessories: Copics, Nesties, Sizzix Scribbles and Swirls, Kaiser Flowers, 1/4" circle punch
Enjoy!
Saturday, May 1, 2010
FireCracker Designs Specials!
Red Rubber set:
Butter/Dragon Fly, 2x3002, 4.49
Dots – Hollow Bubbles, 2x3005, 4.49
Dots – Distress, 2x3004, 4.49
Doodles 7/Paisley, 4x5019, 8.99
Doodles 8/Journal Jammer, 4x5020, 8.99
Innies/Outies 4, 4x5025, 8.99
Total value: $40.44
That's SIX red rubber sets for ONLY $25.00!!
Sale price for set: $25.00
Clear Polymer set:
Curly Bird, CS2X2003, 2.99
Ribbon Moon, cs2x2007, 2.99
Blue Bird, CS2x2011, 2.99
Star, CS2x2012, 2.99
Pussy Willow, CS2x3005, 3.79
Boy w/ Flowers, CS2x3008, 3.79
Total Value: $19.54
That's SIX clear polymer stamps for ONLY $12.50!!!
Sale price for set: $12.50
NOTE: FCD reserves the right to make equal substitutions to fill orders if an item is sold out.
You can see the sets HERE.
OH, and don't miss this weekends FREE digi from FCD! You can find it HERE.
Enjoy!
Michelle B.