Wednesday, October 22, 2008

Visions of Sugarplums


…dance in her head. Well I started out with sketch challenge Mojo57 but I think I ended up straying a ways from that. Sorry.

I was trying to accomplish the look of a little girl in her great big bed, all covered up, dreaming sweet Christmas dreams. I even tried to give the illusion of her tiny body under the turned down covers.

I colored Olivia and the sugarplum dreams my usual way with Copics and Prismacolor pencils. I added some glitter pen to the sugarplum dreams and smeared it with my finger to cover the entire image. I used Nesties to cut out the pillow and sponged some Pink Pirouette around the edges. I used a larger Nestie to cut the scalloped edge on the comforter. I used two different patterns of DP to give the illusion that her blankets were turned down. To show the shape of her tiny body under the covers, I stamped another Olivia and cut her out. I placed her into position over the first Olivia and traced her with a Prismacolor pencil. I then blended that line in with baby oil. I then cut the mats and assembled the entire card. I put the sugarplum dreams up on pop-dots.

Stamps: CC Designs Sugarplums Christmas Scene, CC Designs Pajama Olivia
Paper: Pink Pirouette, Riding Hood Red, Georgia Pacific 110, DP from Stampin’ Up
Ink: Pink Pirouette
Accessories: Copics, Prismacolor pencils & baby oil, Nesties, glitter pen, pop-dots


Enjoy!
Michelle B.
“Queen of the Scene”

Sunday, October 19, 2008

Hollywood Bday


First – clearly I need to learn how to photograph shiny things…sorry!

Today’s featured stamper, Ink-E, had this card in her gallery that gave me my inspiration. When I saw Ink-E’s card, it totally reminded me of this Hollywood idea I’ve had in my sketch book for a few days now.

I changed:
1. The words
2. The bright color (from pink to blue)
3. The sketch (I used SC191)

I did my usual Cut then Ink Technique to get my layers to line up. I used a torn piece of paper as a mask to separate the sky from the land. I brayered Pacific Point on the top. I sponged Black on the bottom. I also sponged some Night of Navy onto the top. I stamped the stars with my Virsamark pad and embossed with silver. I stamped the sentiment in Whisper White. The palm trees were stamped in black, colored in with Copics, and then a bit of white gel pen was added to hightlight. The “HB” was cutout on my Cricut and then a fine line of Copic gray went around some of the edges to shadow. I then assembled onto a piece of Whisper White Cardstock (are you shocked I used white?)

Stamps: The Stampin Place Palm Tree, Stampendous Many Messages, Holiday Tag Team
Paper: Whisper White
Ink: Pacific Point, Night of Navy, Black, Whisper White
Accessories: Copics, Silver embossing powder & versamark pad, Cricut, white gel pen


Enjoy!
Michelle B.
“Queen of the Scene”

Friday, October 17, 2008

Jungle Boogie


DD has been asking about being a nature photographer when she grows up so I thought this would be cute for her upcoming 10th birthday. And it made me think of that Jungle Boogie song (which has been stuck in my head all day) so this card is also for the October 2008: For a Song Central Theme Fan Club challenge.

These cute images were received from my PIF friends Anemone (Thanks Kelly!) and Photoholic (Thanks Shannah!) over at the PIF images thread. These girls have me really hooked on High Hopes and I’m proud to say I have placed my first High Hopes order! Yippee!

I colored the individual images my usual way with Copics and Prismacolor pencils. I then cut them all out. I wanted the jungle greenery to go all the way across the card and I didn't want poor Sheila to get lost in the jungle so I cut the jungle background into 2 pieces. Since these were simple cuts on my background and I wanted them to line up into certain parts of the images, I actually cut them after I inked them (unusual for me). The brown areas needed a little something so I drew in a few more rocks and some dots.

Stamps: High Hopes Sheila, Jungle Background, Jungle Leaf Corner, Hanna Stamps Things Hanna would say
Paper: Real Red, Whisper White
Ink: Blue Bayou, Baja Breeze, Creamy Caramel, Close to Cocoa, Versafine
Accessories: Accessories: Copics, Prismacolor pencils & baby oil, fine black marker

Enjoy!
Michelle B. aka “Queen of the Scene”

Thursday, October 16, 2008

How I Color

ETA: I have recently switched from using baby oil to Goo Gone. I find it blends better and leaves no residue that I have to wait to dry. 2/18/09

I've been promising for a while to give you some info on how I color. I haven't had time to make a card with my DH out of town for 12 days so I thought I could at least get this done. I first heard about coloring with both Copics and Prismacolor pencils on one of my favorite blogs. You can find the entry here.

At the time I read this, I owned about 30 Copic markers. I felt like I had learned how to use them to get the shading I wanted, however, I just didn't have enough colors and couldn't buy them all right now! Ha! This technique allowed me to get all the shading I wanted, not have to own every Copic just yet, and get the fully colored in look of a Copic (not the rougher look of just a Prismacolor pencil).

This is long so just look at the pictures if you want the shortened version!

So, here we go:

First I quickly color in the image using one color Copic marker per area. Because I'm not doing all the scrubbing and blending with the Copics, I do not worry about what type of ink the image was stamped with. Most of the time I just use my Versafine ink pad and Georgia Pacific Cardstock. I also receive a lot of images through trades so I don't know what type of paper and ink were used. I do try to avoid coloring over the black lines...just color right up to them without going over. It is better to go with the lightest shade of the color that you can here. We can darken it later.
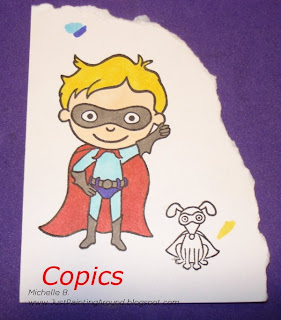


Now for the best secret yet......I spray my image with a squirt of acrylic sealer. I heard this somewhere on SplitCoastStampers but cannot find the original post. I'd love to thank the person and give them proper credit so do tell if you know where I read this!

The sealer dries in just a minute and makes the surface of the paper perfect to blend with Prismacolor Pencils & baby oil. This step is not required and sometimes I do skip it but I'm always happier with my results when I use the sealer. Give it a try sometime!

After that, I roughly add some Prismacolor pencil in all the areas I want to shade. Sometimes I go all around the area (like Billy's hair) and other times I just darken the areas that I want to shadow (like on Billy's cape). Don't be afraid to break the rules here.....you don't need to shade with the same family of color that you markered in. For example, I Copic'd Billy's hair in yellow and Prismacolored in brown. Giving him that sandy blond hair look. I usually Prismacolor in red on my orange Copic'd pumpkins. For black areas, I Copic in medium to dark gray and Prismacolor in the black.
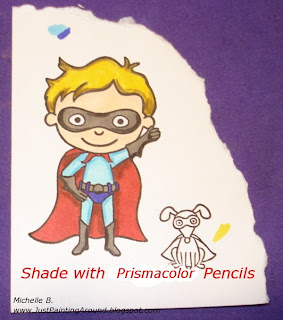


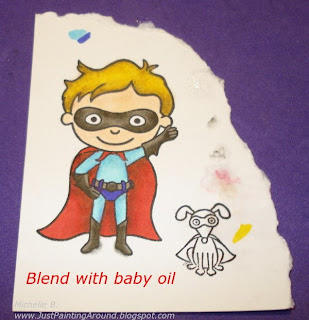
Next, I use baby oil gel (less messy than regular baby oil) and stumps to blend the Prismacolor pencil in. It's also fun to add a 2nd color of Prismacolor pencil in here as well.


And the final, but very important step, is to add white highlights using the white Prismacolor pencil. This is especially important on darker areas (like Billy's cape) or areas you want to be shiny (like shoes).
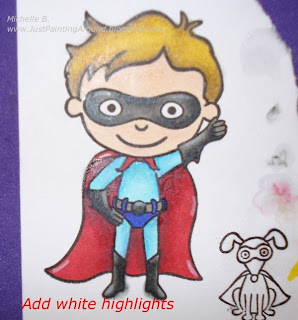


Sorry that last image was a little rotten, that baby oil was really shining! You may notice that I have baby oil and Copic marker all around the edges of my image. I almost always cut my main image out so the area around him is scratch paper for me to wipe off my stumps or test colors.

You can see this image in his finished card here.

So, now you know.

Enjoy!
Michelle B
"Queen of the Scene"

Tuesday, October 14, 2008

The Pumpkin Patch


Today I made a double challenge card. This is for the Mojo56 sketch challenge (love these!) and HHC3 challenge to use stitching. We went to the pumpkin patch this weekend and I just had to make something from all the beauty I saw there.

This cute main image was received from LMcAree (Thanks Lori!) over at the PIF images thread.

(I thought about calling this the Stinky Stiches card. Clearly this isn’t my best skill! Ha!)

I did my usual Cut then Ink Technique to get my layers to line up. For the “dirt” I first sponged the area with Creamy Caramel. I then used a couple of torn pieces of paper as masks and sponged along the edges with Close to Cocoa. To make the pumpkins appear to be tucked in the dirt, I just roughly cut the bottoms off and placed the bottoms up against a dark part of the dirt. The clouds are just a tiny piece of sponge dipped in Whisper White ink. First I dab the top edge of the cloud shape. Then I use the sponge to pull the color down and to the right on the bottoms (smeared).


Stamps: High Hopes Wagon Full of Blessings, Loads of Love Accessories, CC Designs Sugarplums Halloween, Rubernecker Kittie Kit Cause a Scene Out Door Master
Paper: Whisper White, Tangerine Tango
Ink: Soft Sky, Whisper White, Old Olive, More Mustard, Tangerine Tango, Close to Cocoa, Creamy Caramel
Accessories: Copics, Prismacolor pencil & baby oil, paper piercer, fine black marker


Enjoy!
Michelle B.
“Queen of the Scene”

FS88 Snowy City


I was excited to see this week's featured stamper. Anne Ryan has left kind comments on many of my cards. Now it's my turn to honor her! Sorry I'm a little late.

I choose to case this card. I changed:

1) the stamp set however I kept with the little buildings theme
2) I added red to the overall design
3) I changed up the sketch a bit

I was inspired by two others today as well. I've been wanting to add snow to my images like Kittie does. I admit I had to take a really deep breath before I stamped that white over the top of my sky and buildings. Now, I love the look. I was also inspired by Michelle to try to do Christmas cards for my challenges. What a great idea to have fun while "getting the job done".

Although its difficult to see. I added little snow drifts by sponging some bashful blue near a mask of torn paper. Then I drew a line of glitter pen over the drift and smeared it with my finger. Here's a close up:


Stamps: Lizzie Anne Designs Holiday Lane, Itty Bitty Backgrounds, Snowfall
Paper: Whisper White, Real Red, Bazzill Black
Ink: White, Bashful Blue, Blue Bayou, Not Quite Navy
Accessories: Copics, Prismacolor Pencils & Baby Oil, Ribbon from Mike's, Glitter pen


On a different note, you know your style is really becoming prominent when you 6yo DS picks up on it. He drew me a picture the other day and divided his scene up like I always do. He even used red which is my favorite color to layer with. How cute!


Enjoy!

Michelle B.
"Queen of the Scene"

Friday, October 10, 2008

Hello from St Louis


I promised a friend (Hi Cyndee!) that I'd send her son a card for a recent accomplishment. He is interested in geography and loves to learn about different places. So, I said I'd make him a card about my home town, St. Louis. I've been dreaming for weeks about all the awesome things I could put into this card....so much so that I lost site of COMPLETING the project. Today's challenge was just the "kick in the pants" I needed to simplify my design and get moving on this.

The "arch" is hand cut from metallic silver paper. I was trying to feature St. Louis's Arch, awesome zoo, and professional baseball team.

Stamps: My Favorite Things Can Ya Dig It, MFT It's a Jungle Out There, MFT Going Places, Lots of Thoughts, All in the Family Accessories, Rubber Stampede Mirror Image Stamp
Paper: Riding Hood Red, Whisper White, Metallic Silver (from Mike's)
Ink: Soft Sky, Baja Breeze, Old Olive, Kiwi Kiss
Accessories: Copics, Prismacolor Pencils, Fine black marker


Enjoy!
Michelle B.
"Queen of the Scene" (look, I got really brave today and put that title on my SCS post today too!)